Mailfence is a solution packed with tons of features. So we created THE ultimate guide to help you breeze through our solution without any problems.
- Getting started with Mailfence
- Mailfence Email
- How to compose an email
- Reset your Mailfence password
- Layout settings & more
- Set up custom signatures
- Keep everything organized
- What are Filters and how to use them
- Whitelisting: how does it work
- Email addresses with custom domains
- Using our Search bar
- Mailfence mobile app
- Synchronize Mailfence with email clients
- Share your mailbox
- Digital Signatures
- Migrate your messages
- Back-up your Emails
- Encryption Basics
- Mailfence Groups
- Ultimate guide on Mailfence Documents
- Ultimate Guide to Mailfence Calendar
- Ultimate Guide to Mailfence Contacts
- Advanced features
- Mailfence support resources
Getting started with Mailfence
Once you register and confirm your notification email address. Log in with your username and password and you are just one step away from creating your very own Mailfence email address.
First, choose an alias from the drop-down menu on the left. Then on the right, choose between different domains available.
Mailfence has 4 tools: Mailfence Email, Mailfence Calendar, Mailfence Documents, and Mailfence Contacts. The Mailfence Groups allow you to collaborate with other Mailfence users.
Mailfence Email
How to compose an email
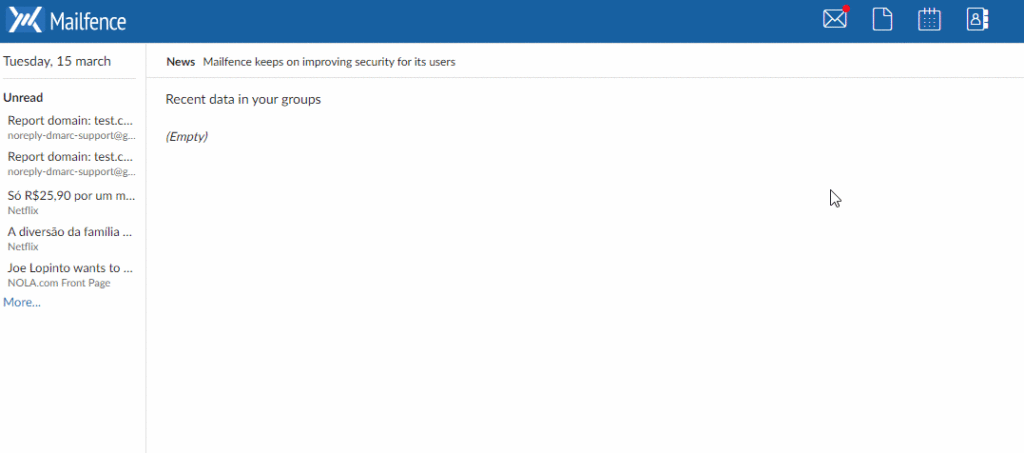
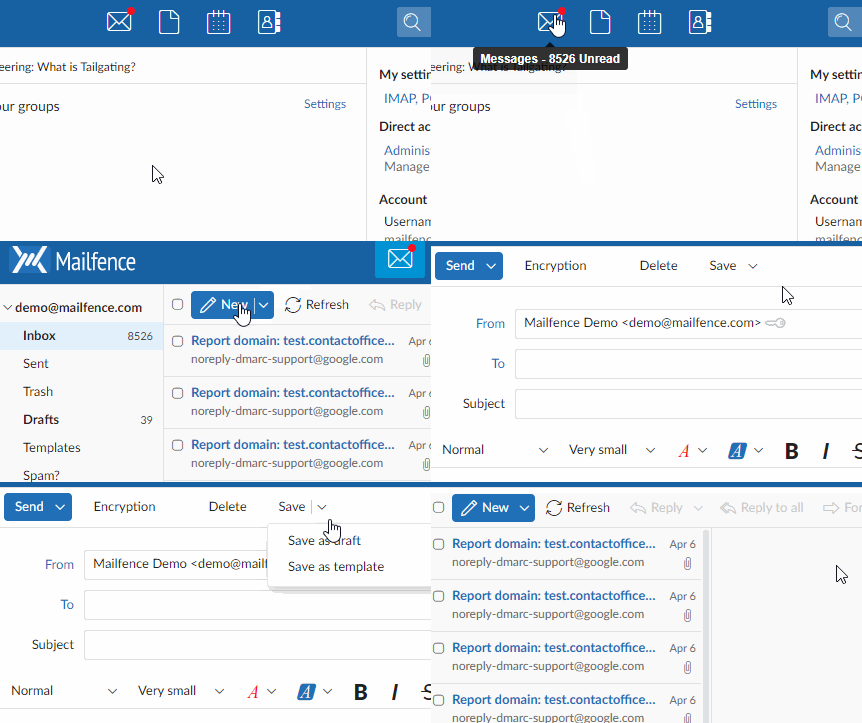
Click on the Email component, then Click on the blue button called “New”.
From there, fill in the Subject and To fields. Write your message. Email looks too boring? Rich text formatting is going to be your new best friend. To activate Rich-text Formatting, click on your profile portrait on the top-right -> Settings -> Messages -> General -> Layout -> Rich-text Formatting.
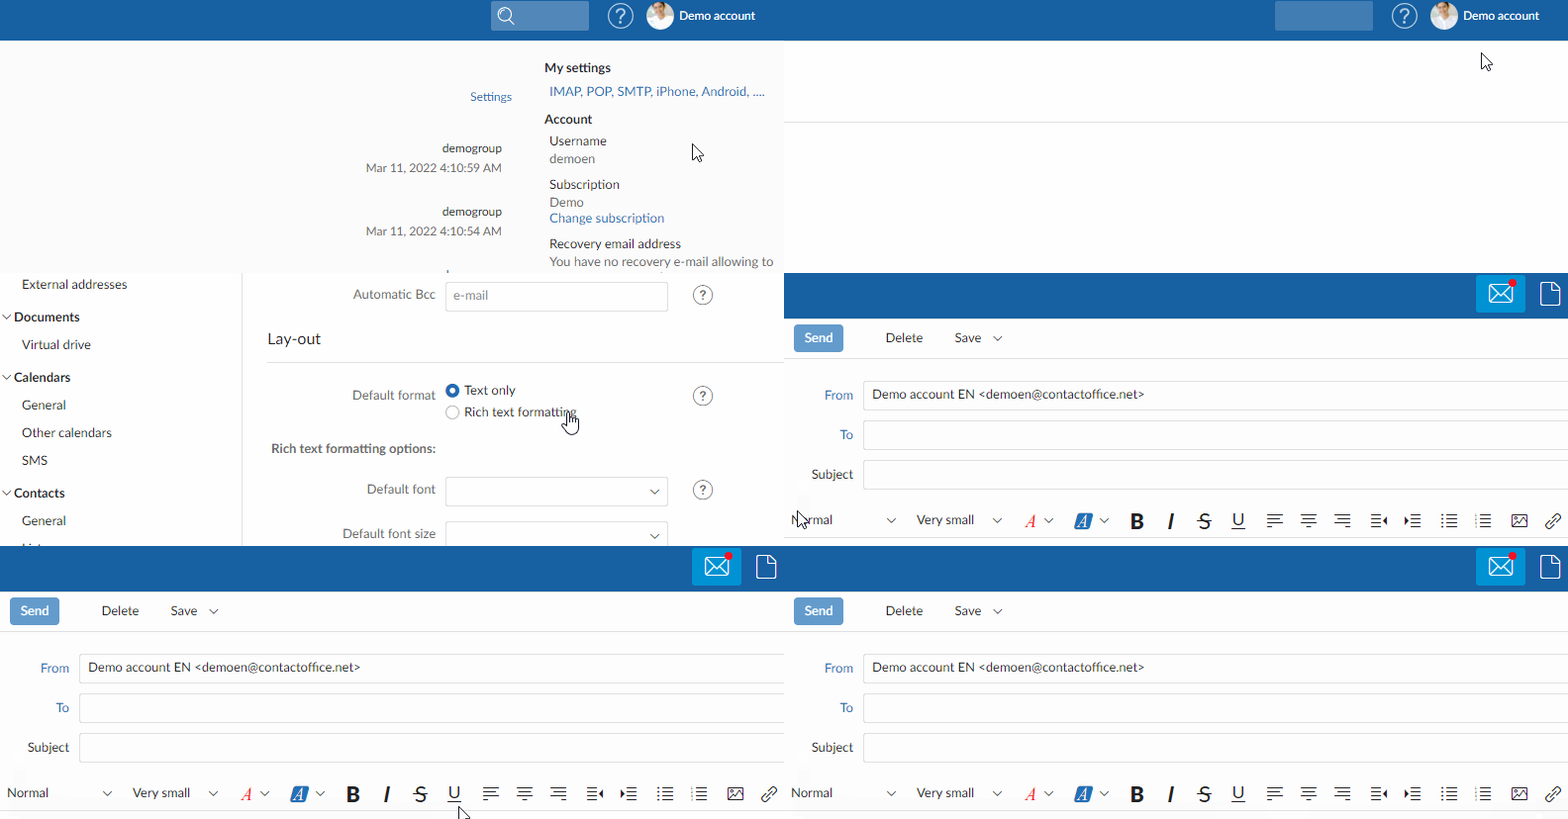
You can choose the font style, size, and color. All emails include a default signature “sent with https://mailfence.com” You can either keep it to show your friends that you use a secure and private email or you can setup a custom signature.
Reset your Mailfence password
There are 2 ways to reset your Mailfence password. For more info visit this KB article.
Layout settings & more
The general message Settings contain a lot of options for you to customize your Mailfence Email.
By default, for your protection Mailfence does not load images and other active content from external sources in received emails. You can further restrict that by going to Settings -> Messages-> General -> Display mode.
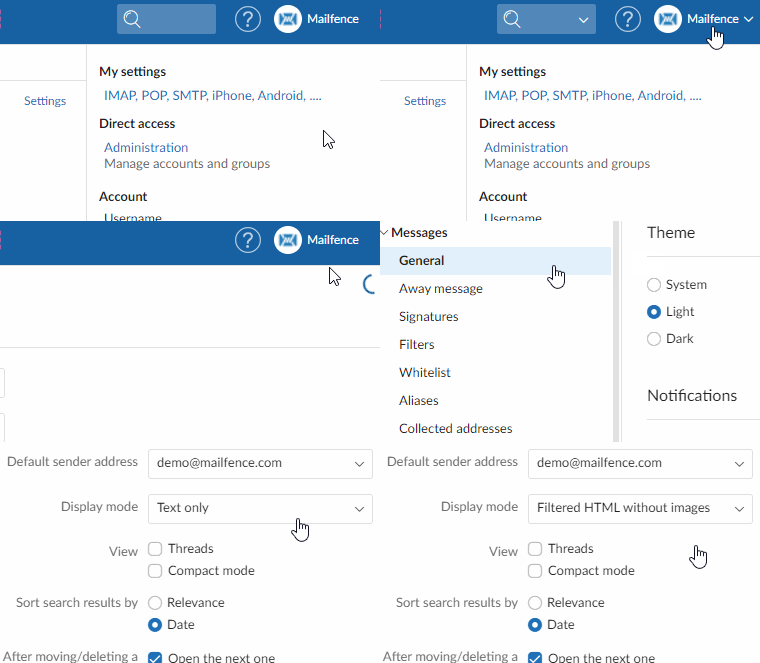
We invite you to play around with the settings and see which ones suit you the most.
Set up custom signatures
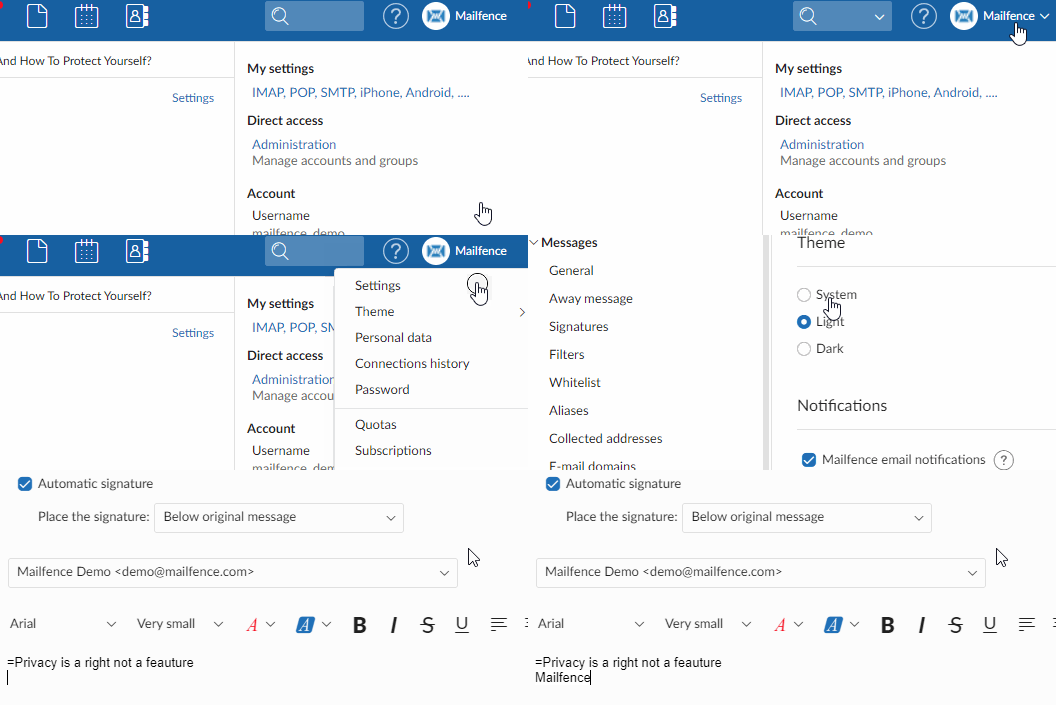
To setup a custom signature please click on the custom signature link. Custom signatures add personality when sending an email. Especially if you are a business owner. You can either apply it automatically in every email you send or apply it manually.
Keep everything organized
If you plan to send a lot of emails you might want to create templates to speed up the process. Additionally, to keep your folders tidy you can create tags/labels.
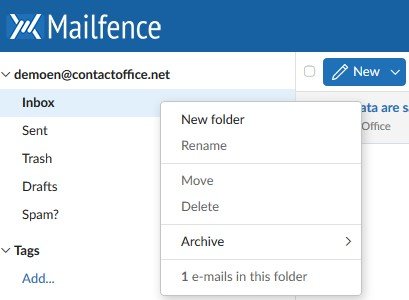
Mailfence Email by default comes with 5 standard folders. To create an additional folder simply right-click on one of the folders and select “New folder”. Learn more about folder management.
What are Filters and how to use them
Filters are rules that you can implement on your messages in order to perform certain actions. For example, you can set Filters to blacklist certain domains/email addresses.
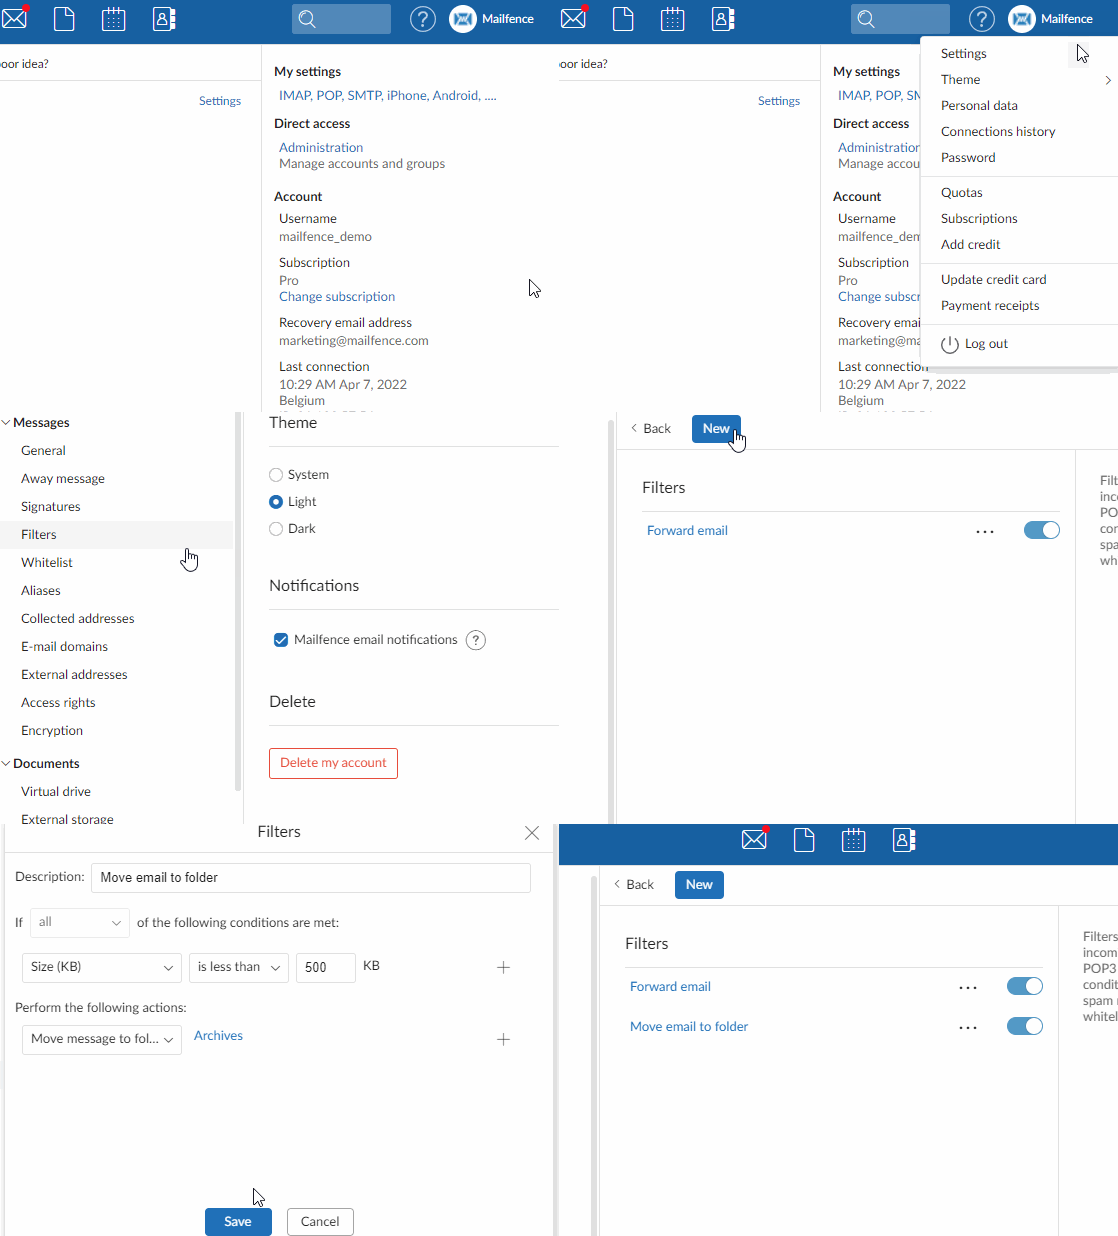
Note: Not available in free plan.
Whitelisting: how does it work
Whitelisting will allow you to deactivate the anti-spam filter on domains and email addresses you absolutely wish to receive email from. When an email ends up in your spam folder, whitelisting its sender address or domain makes sure future emails do not end up in the spam folder anymore.
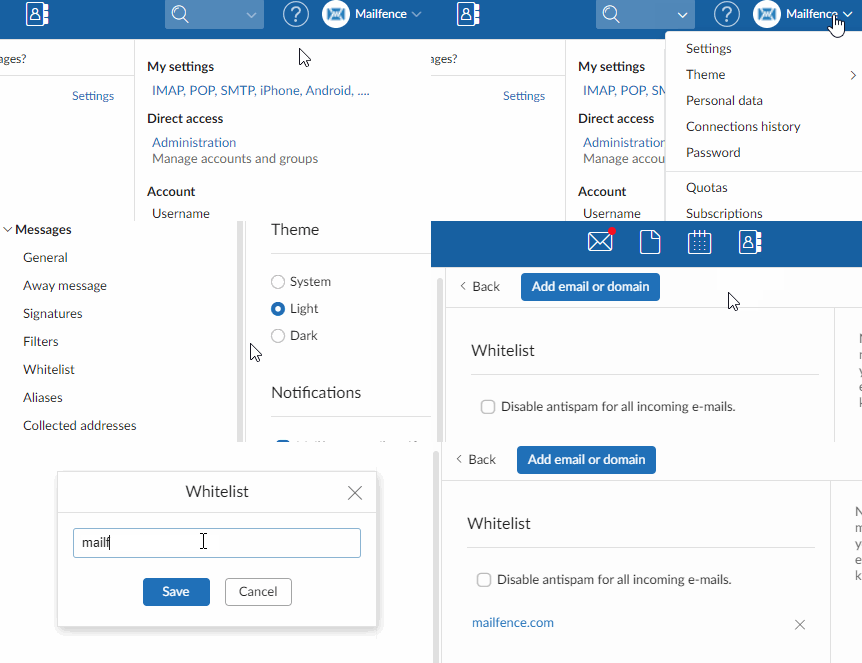
Note: This is a paying feature only.
Email addresses with custom domains
Another powerful feature of Mailfence is the ability to create an email address with your own custom domain. Having your own custom domain adds professionalism, character, and credibility.
If you own a business, it’s an absolute must. 2 key takeaways before we move to the next feature:
- Mailfence does NOT commercialize domain names. You need to be the owner of a domain name.
- Creating a custom domain email address is reserved for paid plans only.
Using our Search bar
We have implemented a search that can be used to easily access emails, documents, calendar events, and more. It’s located right next to your profile portrait.
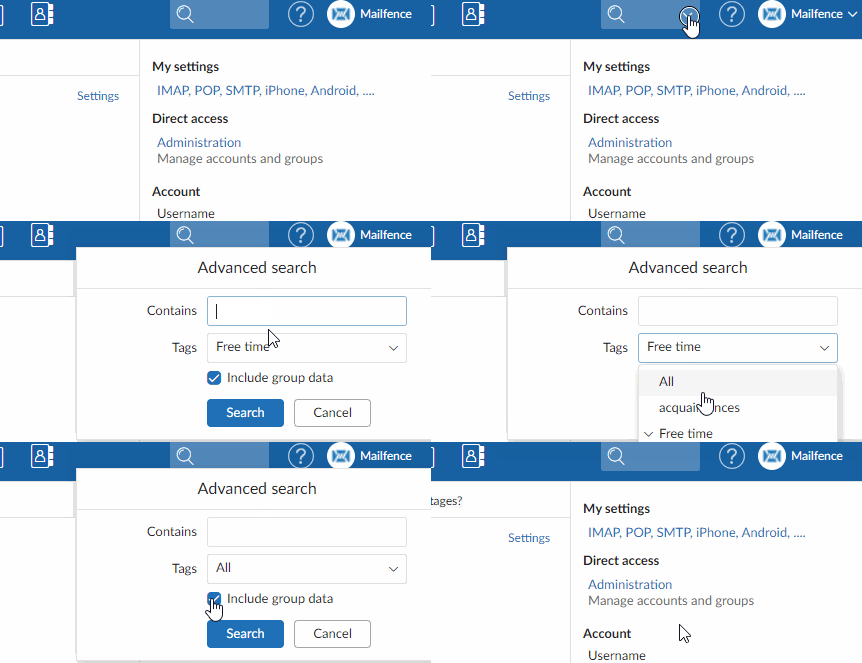
How does it work? If you haven’t selected a tool (Welcome dashboard or Settings), the Search tool will run a search through all the Mailfence components. Else, the search applies only for the specific tool you are using: for example the Mailfence Email. You can also use advanced filters to narrow down your search. Click on the drop-down menu next to your search term. You can view the filters above.
Mailfence mobile app
Our mobile app is a nice companion to have if you would like to access your account while you are on the go. Everybody can use our app even free users.
If you want to install our mobile app you can go directly to the installation steps.
Synchronize Mailfence with email clients
One of the many benefits of Mailfence is that you can use it with all of your favorite tools. We designed Mailfence with interoperability in mind so you can sync our solution seamlessly and effortlessly. You can sync Mailfence via IMAP, POP, and Exchange ActiveSync. Each protocol has pros and cons so we highly recommend that you check out our analysis on them.
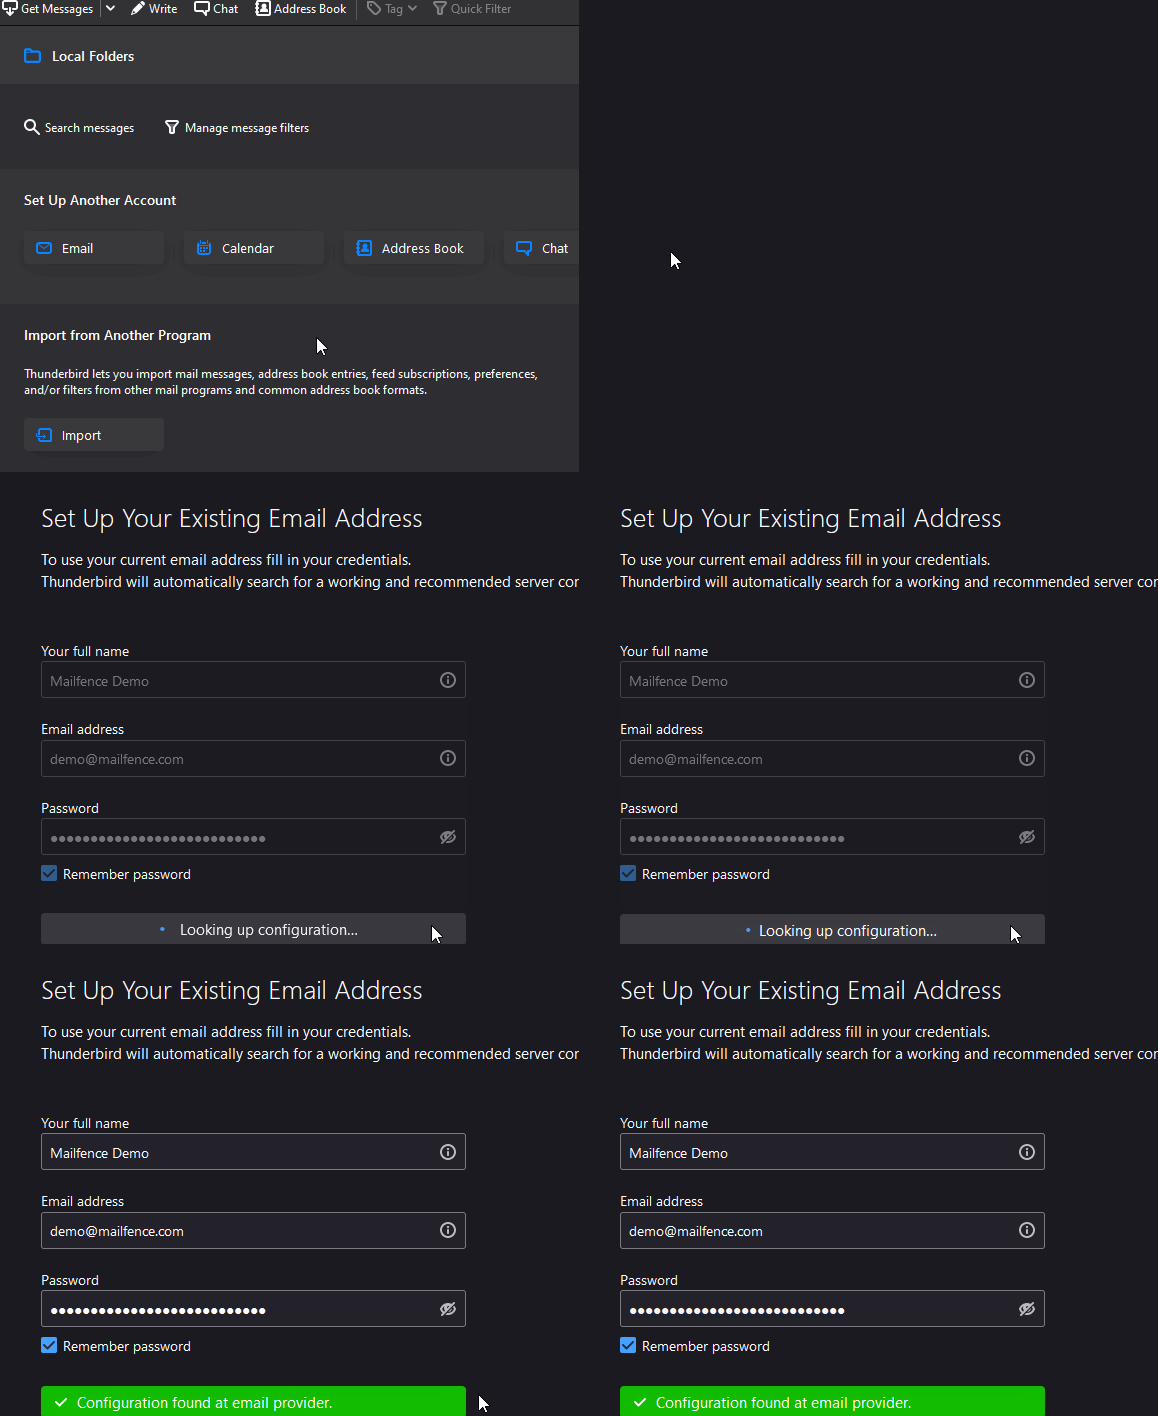
What to consider when synchronizing Mailfence with 3rd party clients? Check whether they support the protocols we do but also check whether the email clients support OpenPGP so you can send encrypted emails via their email client. Here is a list of clients that support OpenPGP.
Note: This is a paying feature only.
Share your mailbox
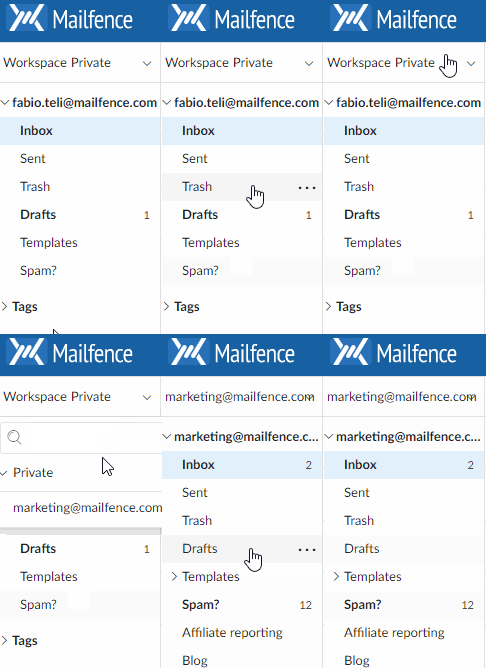
An added value of a shared mailbox is that you don’t have to log in between two separate accounts, you can just use our shared mailbox function and you will have access to a 2nd mailbox. This allows for seamless collaboration between colleagues as you don’t need to share login credentials.
To setup a shared mailbox please go to this KB article. Once done you can access shared mailbox:
Note: This feature requires you to have a PRO plan.
Digital Signatures
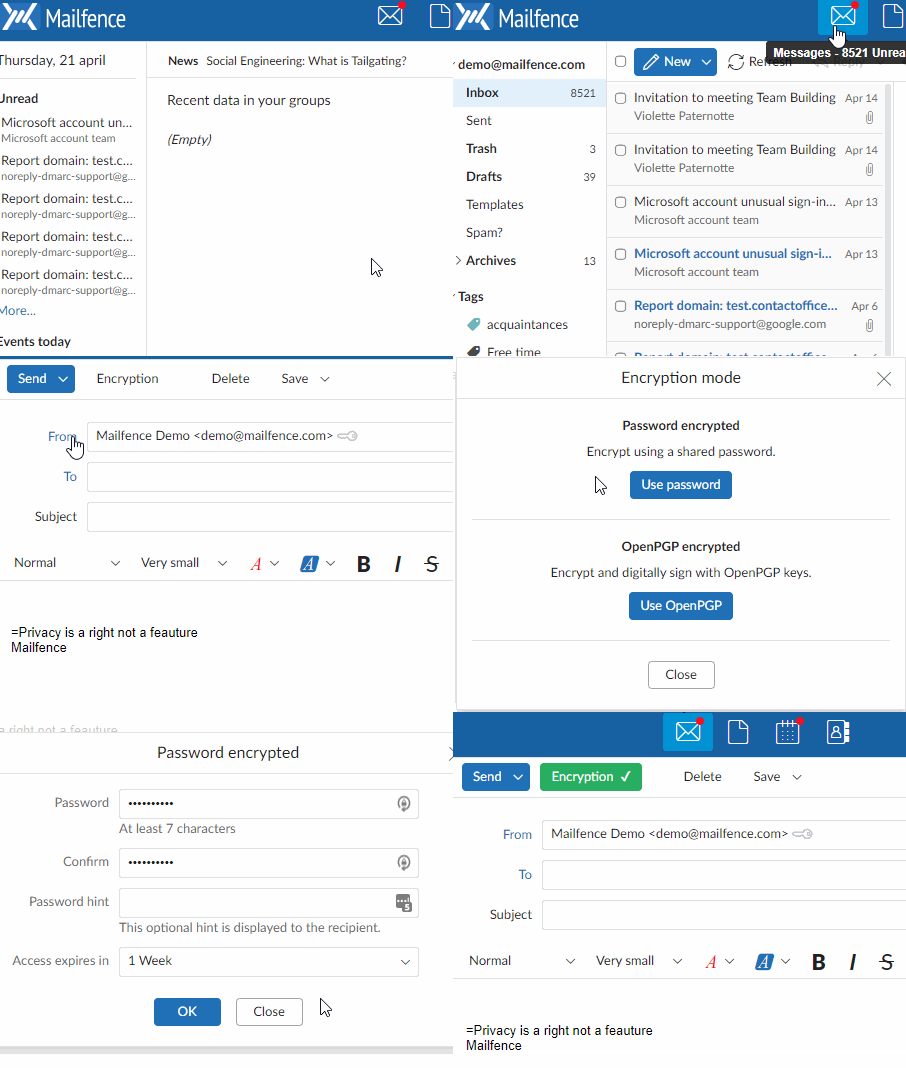
Do you want to take security a step further? Then use end-to-end encryption combined with digital signatures. How do digital signatures work? For starters, they make sure the sender is who he/she claims to be and is not an impostor. Secondly, the message was not tampered with in transit so you can open its attachments or simply read it with full confidence. Finally, the sender cannot deny that he/she did not send the message.
Migrate your messages
You can use the import function to import messages from another provider in EML format. Currently, the import function is not meant for large files, the maximum capacity is 45MB. If that’s too small, you can also map your client via IMAP. Mapping via IMAP is a paying feature only.
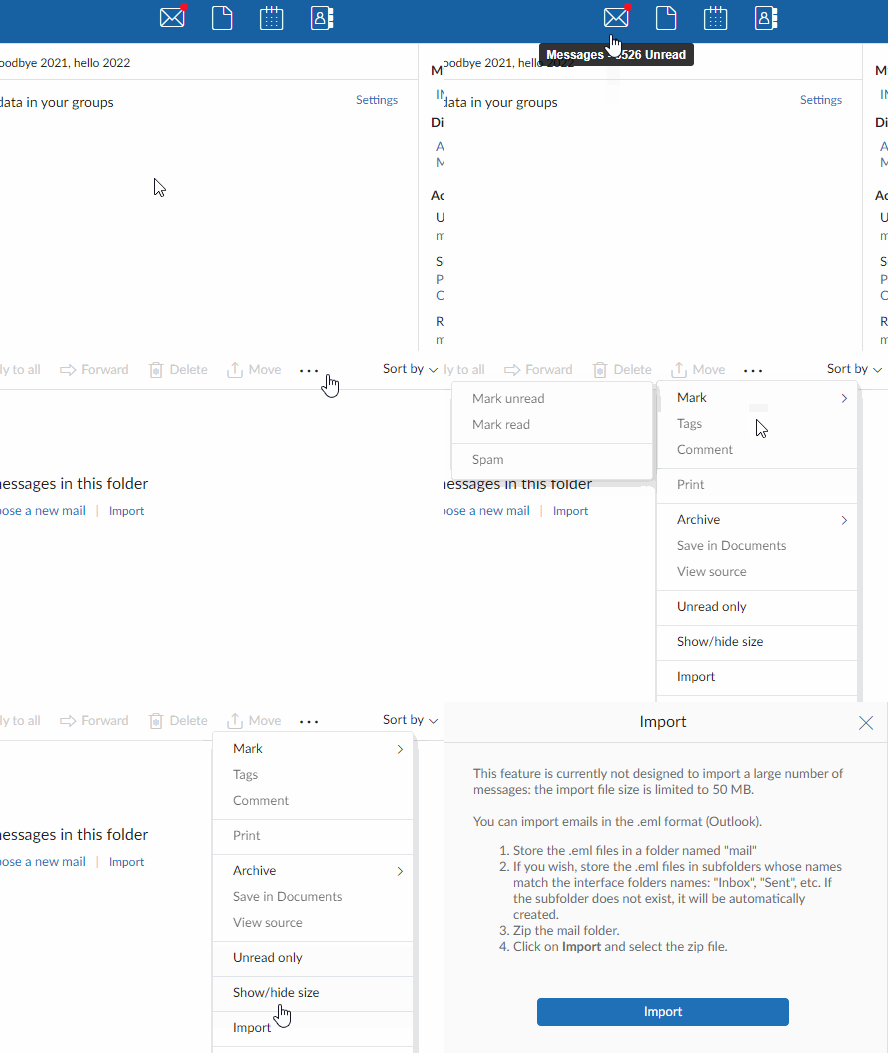
If you are migrating from Outlook or Gmail you can easily follow the steps in the linked articles and migrate to Mailfence. The same process applies to other providers like Tutanota or Protonmail.
Back-up your Emails
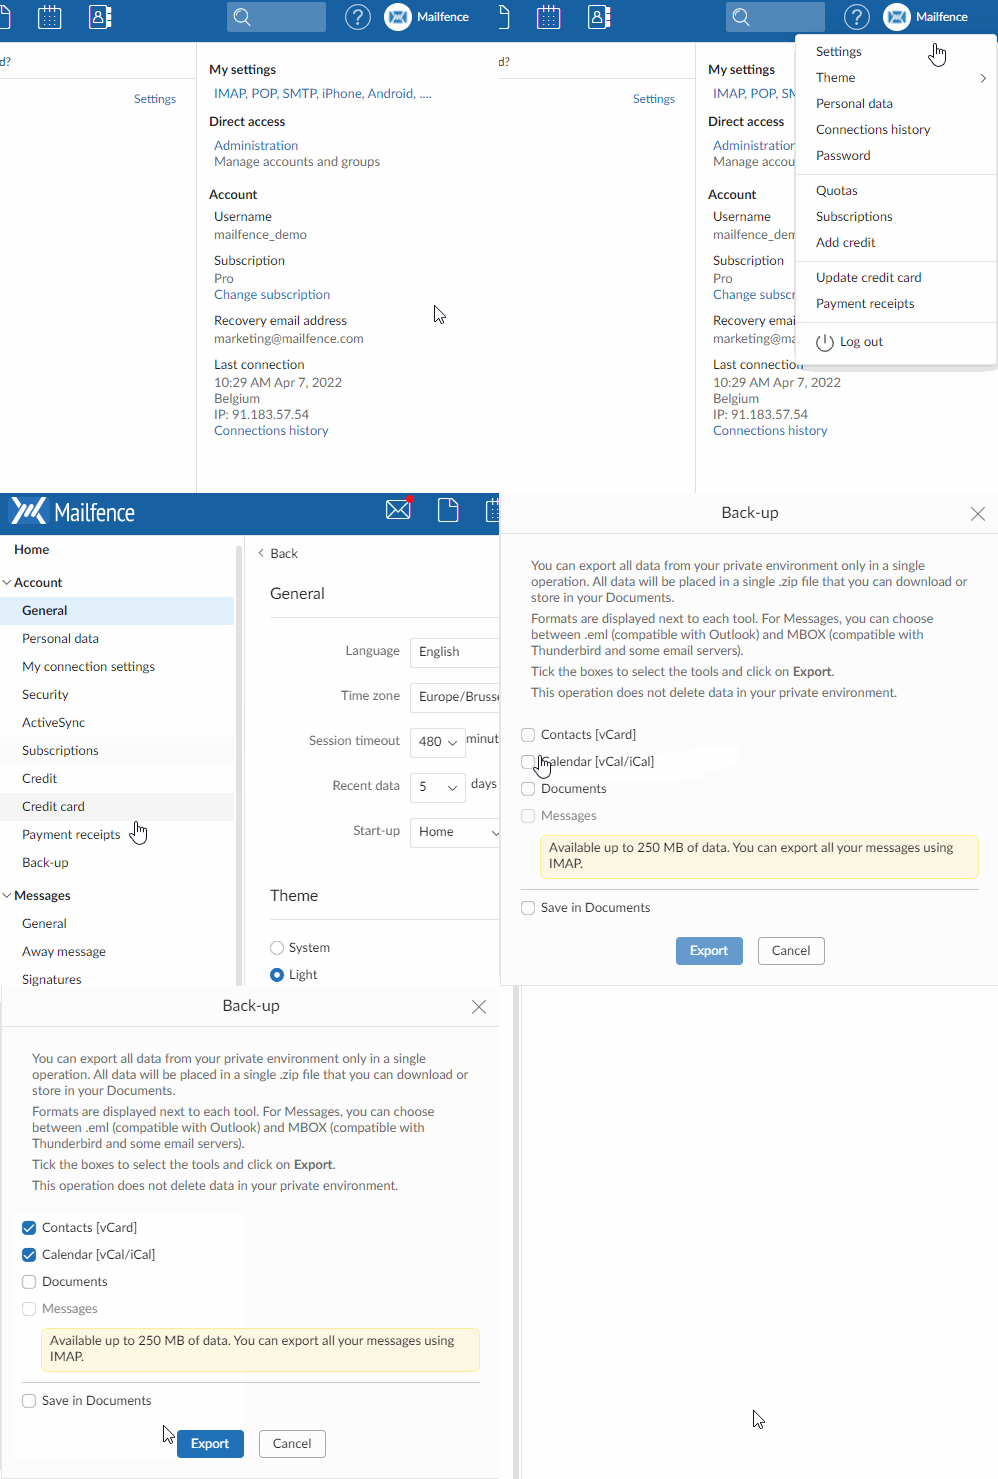
If you own a paying subscription you can easily back up your emails. Just go Settings -> General -> Back-up. This option allows for up to 250MB to be exported at a given time. Alternatively, If you want to export a ton of messages you can export them via IMAP.
Encryption Basics
We saved the best for last, with Mailfence you can encrypt symmetrically or asymmetrically.
Symmetric encryption sets a password to encrypt your message. You need to share that password (via SMS, social media, instant messaging, in-person) so the recipient can decrypt the message. Additionally, you can set a password hint to help the recipient, just do yourself a favor by not making it too obvious.
With asymmetric encryption, you encrypt the message with the recipient’s public key and the recipient decrypts with his/her private key. We highly recommend that you check our dedicated blogposts on the 2 encryption methods.
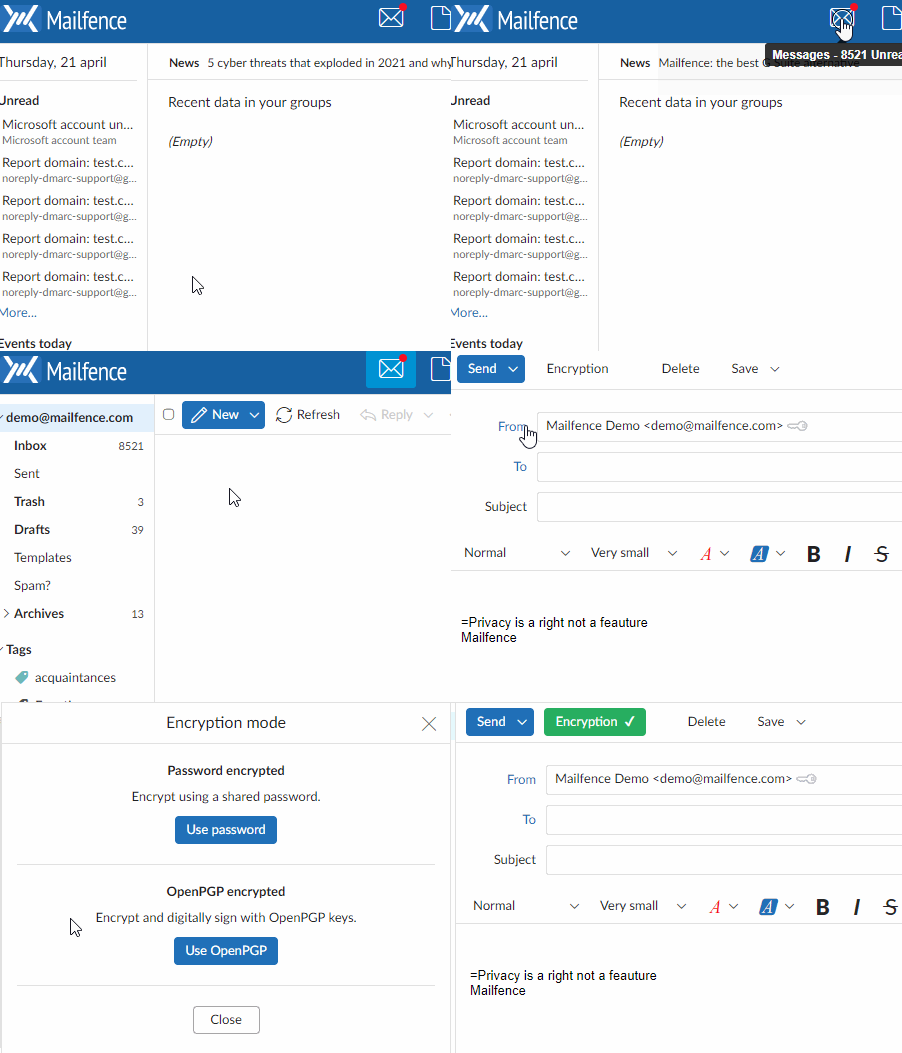
Which method you choose, should depend on what you prefer. Our symmetric vs asymmetric encryption article will help clear things up.
Mailfence Groups
Mailfence Groups allows you and your team to collaborate efficiently. That way you won’t have to resort to external group services that track you and your team.
Groups allow you to do the following:
- Each tool has its own groupspace (Group Calendar, Group Documents, etc..). All groups members have access to this common workspace
- You may also share your private data with your group members
- Group members can also share their email or give access to their private calendar
- Finally, group members can also see the online presence of the other group members and to textual chats
To create a group, click on your profile portrait -> Settings -> Groups -> Create a group OR Join an existing group.
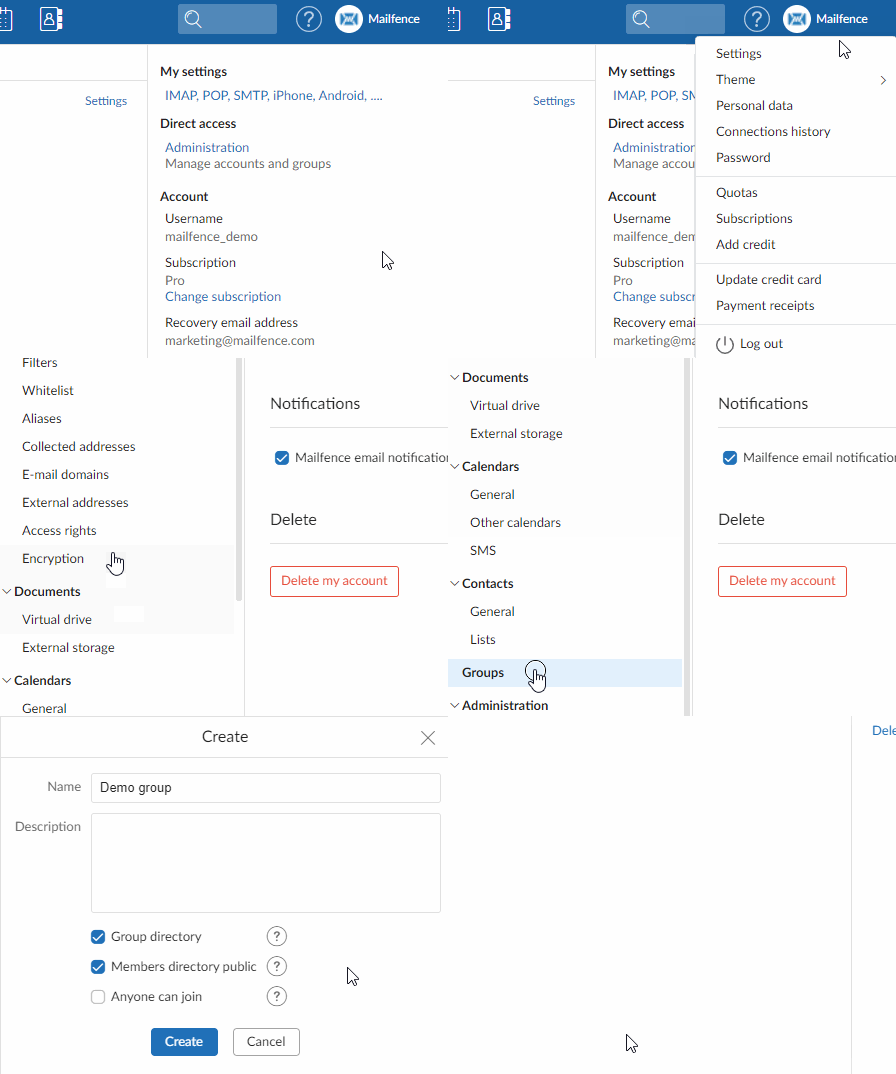
For the full list of capabilities on Mailfence Groups please visit our documentation page that outlines every detail of the group function.
Ultimate guide on Mailfence Documents
Mailfence Documents is a document storage and editing space. Much like Mailfence Email, it has lots of features that boost collaboration and convenience. For instance, you could give specific rights to group members so they can have direct access to a shared document or you could set up a virtual drive, to access the documents stored in the cloud straight from your machine.
Document basics
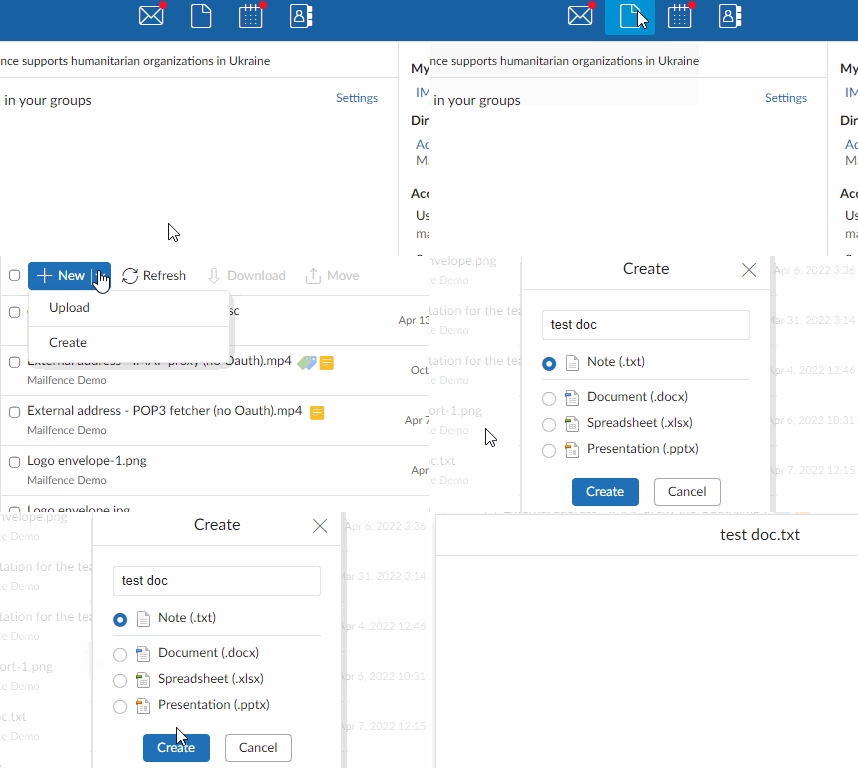
To start, go to the Documents component. Click on the blue button “New” and either upload or create a new document. Now let’s look at what you can do after you’ve uploaded your first doc.
- You can share it with your team
- Attach a tag to it
- Download it and so much more…
- For the full list of capabilities check our dedicated article on Documents.
Earlier we talked about the virtual drive which lets you access Mailfence Documents without even being in the Mailfence interface. Click on your profile Portrait on the top right -> Settings. Scroll down until you see the option Documents-> Virtual drive as illustrated below. Finally, click on your operating system and follow the on-screen instructions.

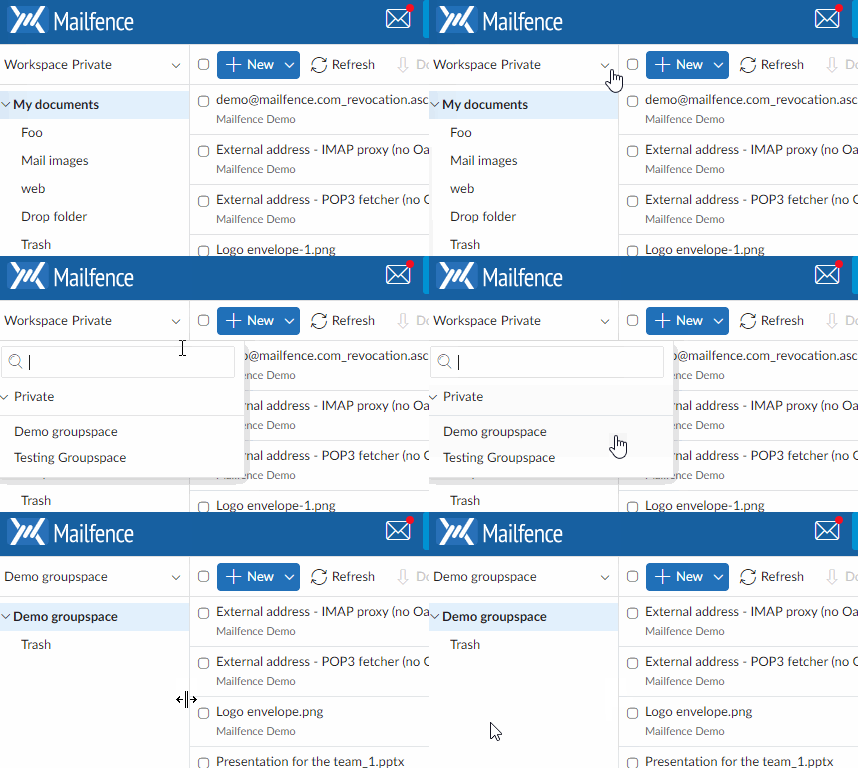
Once you belong to a group, it’s simple. All you have to do is to go to the Mailfence Documents tool then select your group from the drop-down menu.
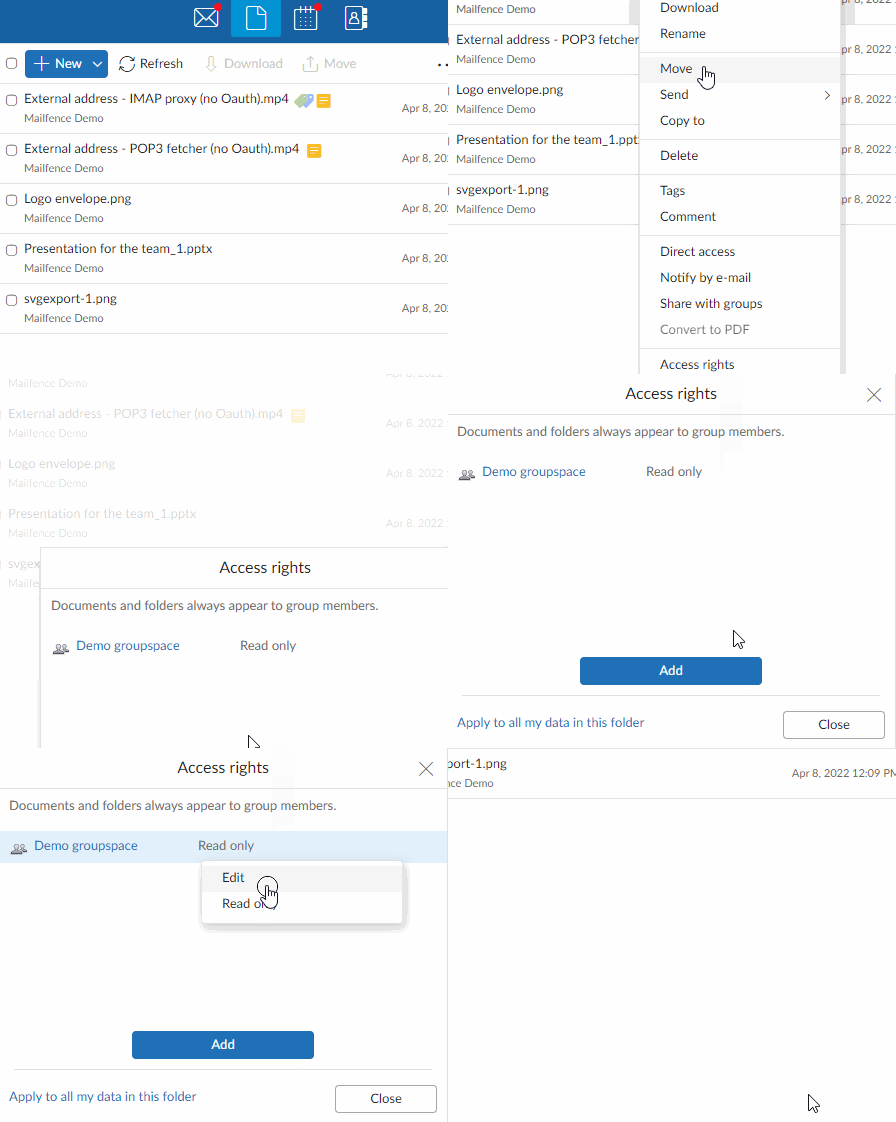
Once you select the group you will be able to see the documents of your group and if your rights allow it, you will be able to edit or delete. To check your access rights, simply right-click to a group document and click access rights.
Online editing & collaboration
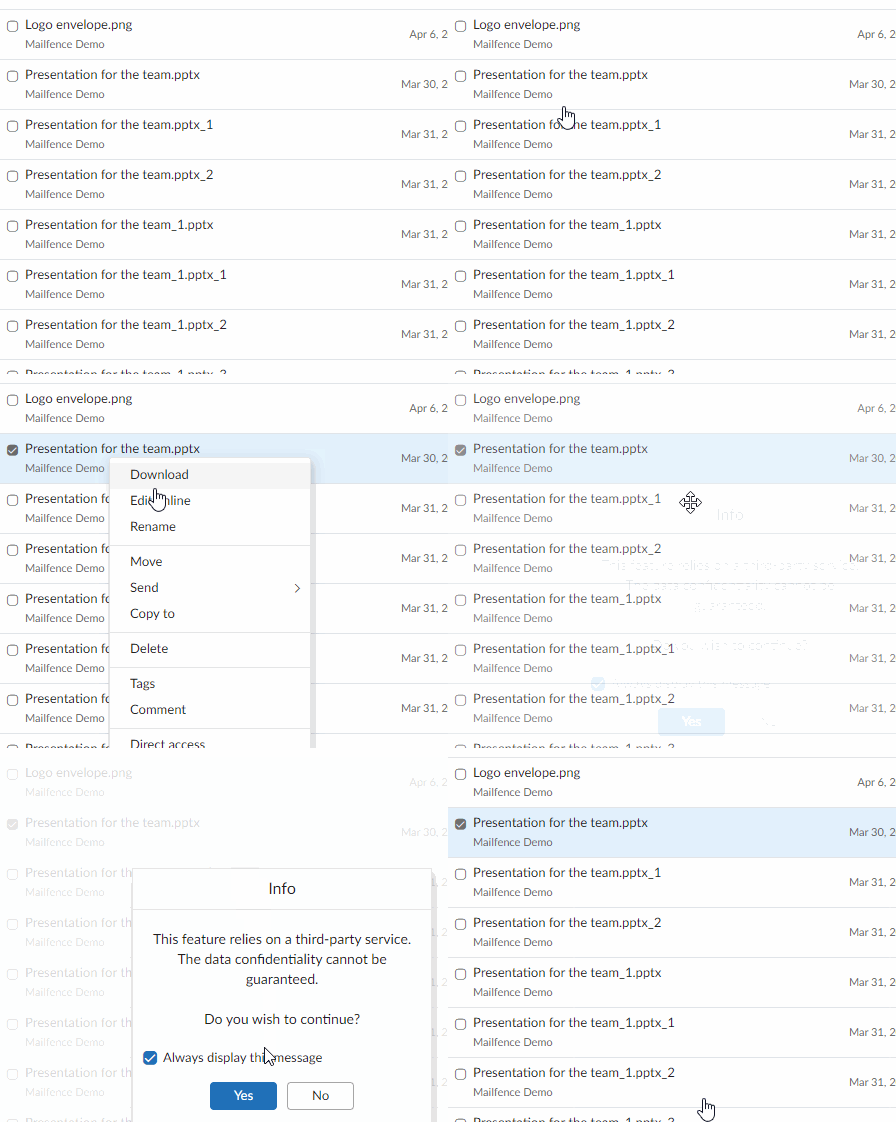
If you are subscribed to one of our paying plans, you will get the option to edit documents online without having to download them. To check whether you can edit online simply right-click to a document and Click “Edit Online”. What’s cool about this feature is that you don’t need MS office or any document editing software. Moreover, you & your team can all edit the same document together at the same time.
There are some limitations e.g., online editing feature supports auto-save but there will be occasions where you will have to save manually. Finally, the maximum allowed capacity of the document must be 10MB.
Drop Folder function
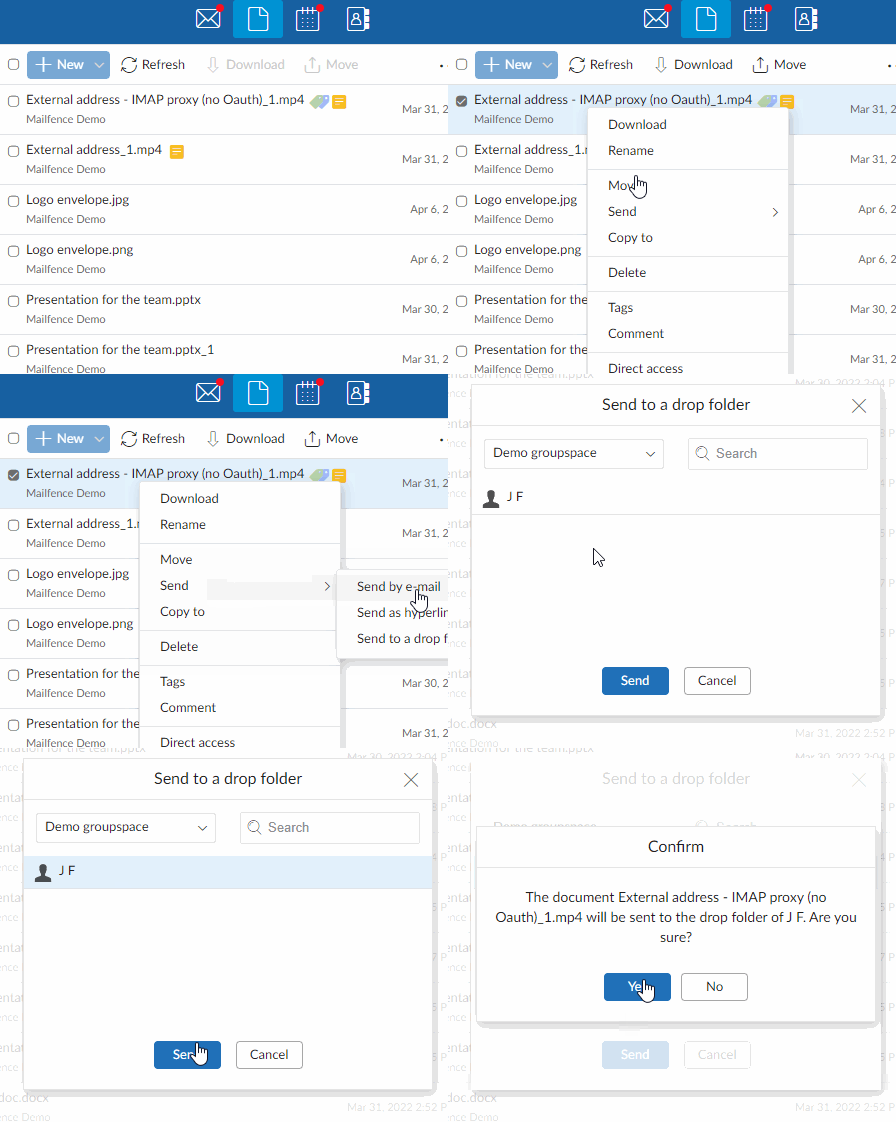
With the drop folder function, you can easily send a document to a group member in a matter of seconds. This is useful because you can send a document securely without having to send it through email. It also creates a copy for you when you drop that doc so you are not affected by any change in the doc.
Convert to PDF
With Mailfence you don’t have to resort to additional services to do a PDF conversion. We have one built-in. Simply right-click to your chosen document and choose the final option “Convert to PDF”.
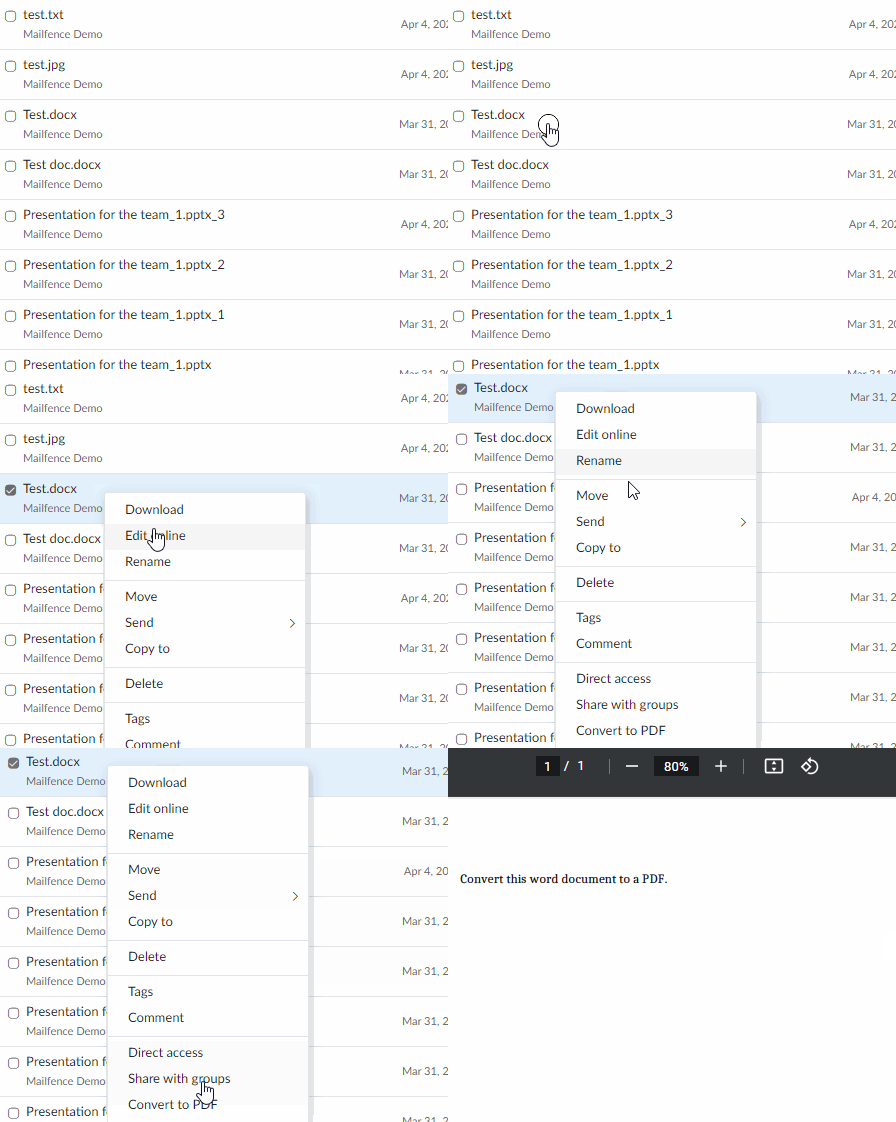
Note: this is a paying feature only.
Public access
You can publicly share documents with the public access feature. Let’s say you would like to share a case study with your colleagues/friends. Everybody can view this publicly shared document, even non-Mailfence users, and without authentication.
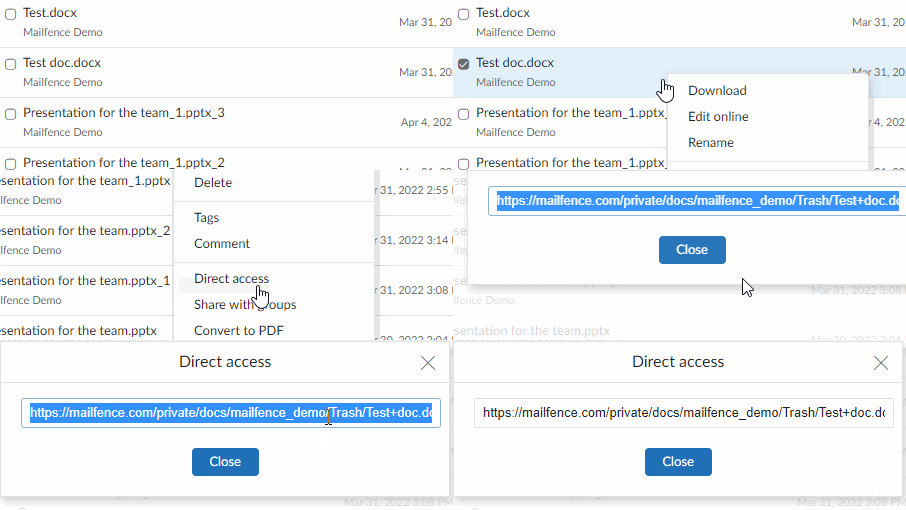
Pay attention to what you share, please do not share documents with sensitive info.
Migrate your Documents to Mailfence
Are you coming from another provider? You can migrate documents via WebDAV. It is an extension of HTTP that allows clients to perform web-content authoring. Basically, it allows you to change or move documents on a server.
If you are migrating from Google drive or One-drive you can read our dedicated article.
If you are migrating from another service you can still connect to that service if they have a WebDAV server. Go to Settings -> Documents-> External Storage.

Back-up your Documents
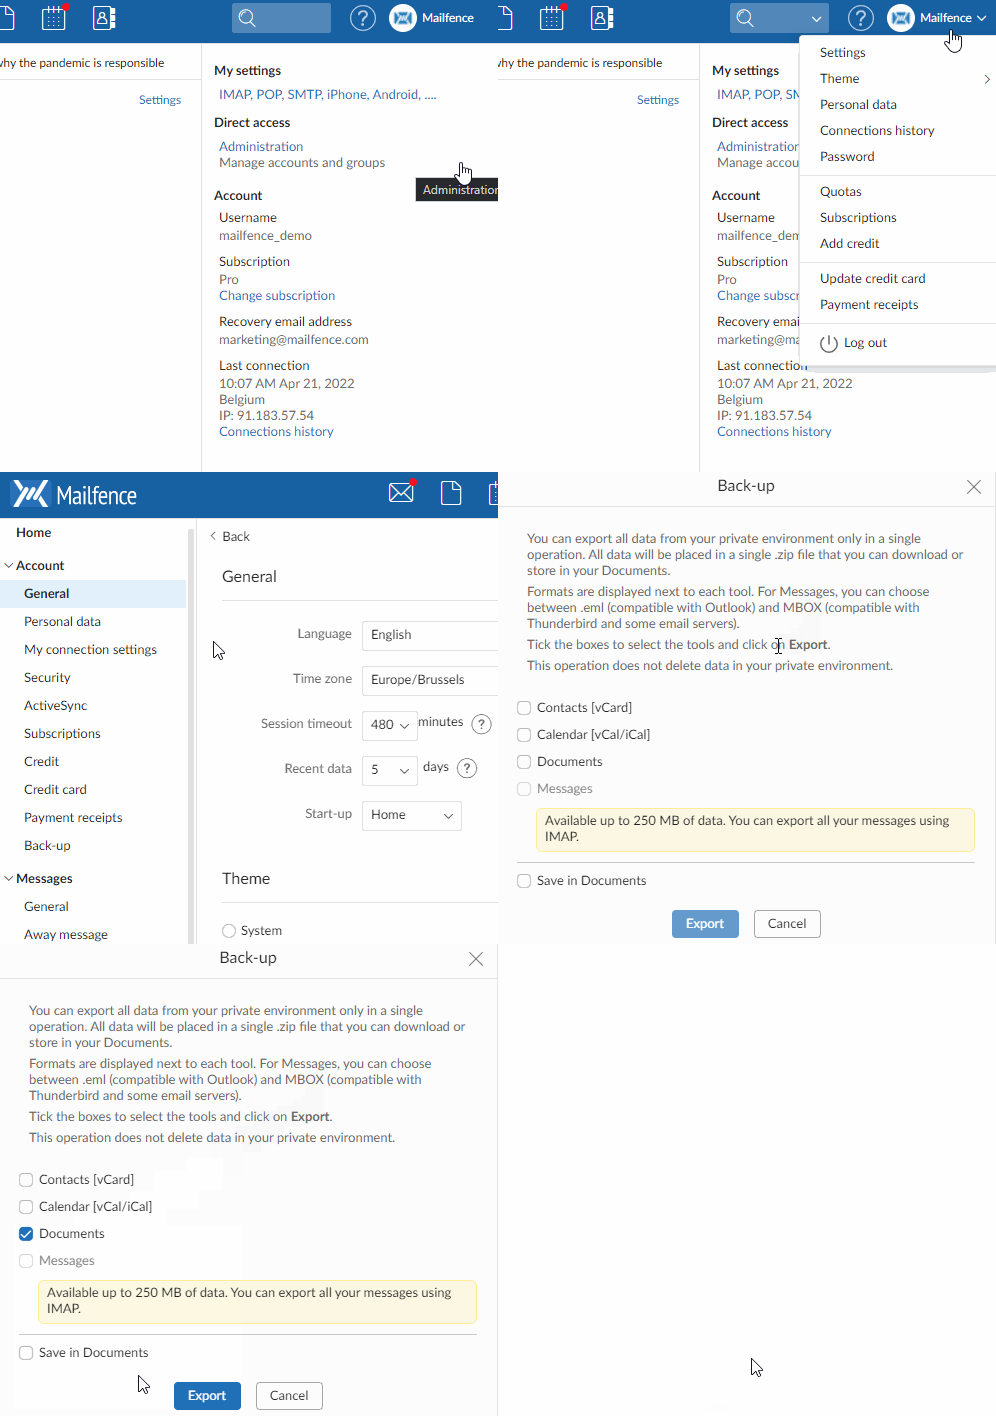
If you are a paying user you can go to Settings -> General -> Back-up and click Documents. You can also back-up your documents in your Documents tool.
Ultimate Guide to Mailfence Calendar
In this section, we will answer questions like, what is the Mailfence Calendar, what can you do with it. The Mailfence Calendar tool is more than just a calendar where you can make events, it is a collaborative tool where you can coordinate with your team. You can create polls and invite your team to take part. You can share your calendar publicly, which means you don’t have to give rights to every individual to view that calendar. Finally, you can also set up meetings. Let’s breakdown each and every feature of the Mailfence Calendar.
Getting started with your Personal Calendar
To get started with your personal calendar go to the Calendar component. There you will be able to create a calendar or a poll. There is a variety of things you can do:
- Duplicate an event
- Repeat an event
- Set a color for an event
- You can also share your personal calendar
Access other calendars
In the Mailfence Calendar, you can also view, edit, and access other calendars. Such a calendar could be a group calendar you belong to or even an external calendar from services like Outlook and Google Calendar.
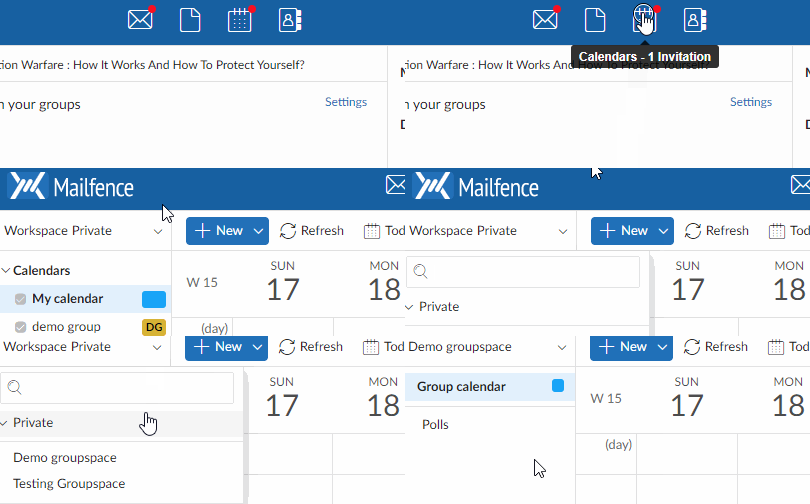
You may also view the calendar events of your group members. By default, you will be able to view their busy timeslots and not the actual details of their calendar events. The owner of a calendar can give additional access rights to the group members. They can give READ right, which allows group members to read the details of the events. If you have been granted Read & Write you may not only view but also edit and delete calendar events.
Create multiple calendars
Normally, Mailfence allows you to have one personal calendar. However, you can have multiple calendars by creating a group and using the group calendars as your calendars.
Group calendars & collaboration
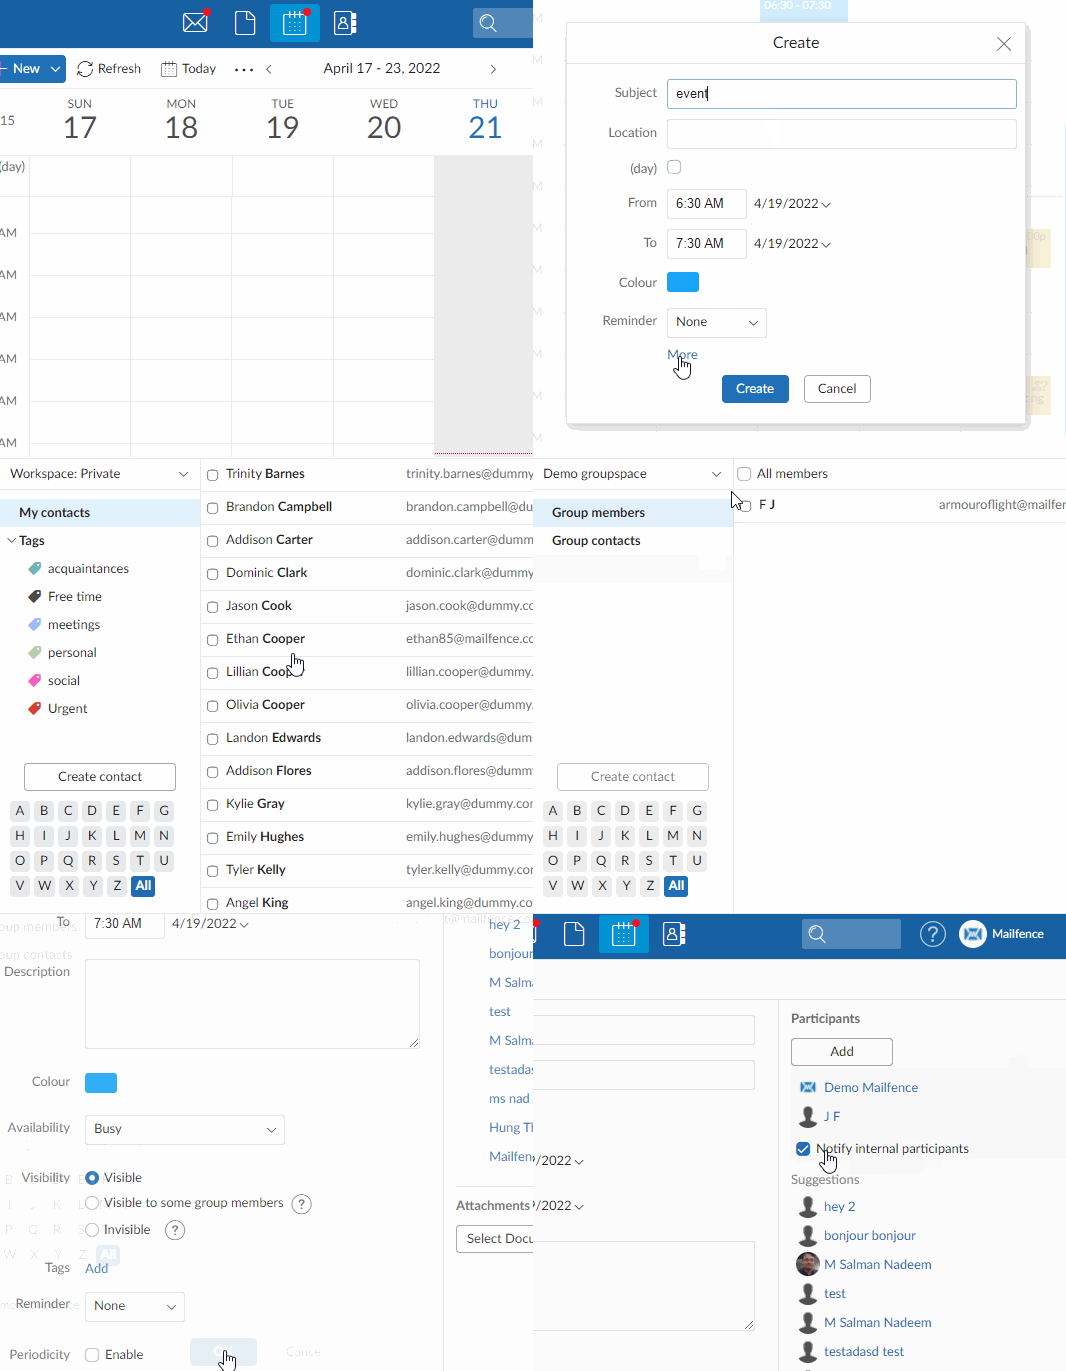
Collaboration is at the heart of the Mailfence Calendar, you can seamlessly schedule group events, polls, or even meetings. You can easily invite all of your group members with the push of a button. For this to work, you have to make sure you belong in a group first.
Meetings & Polls
What is a meeting? It is a calendar event that has participants. Calendar events become meetings automatically once you invite participants. All you have to do is to create a new calendar event and on the right-hand side, select add a participant.
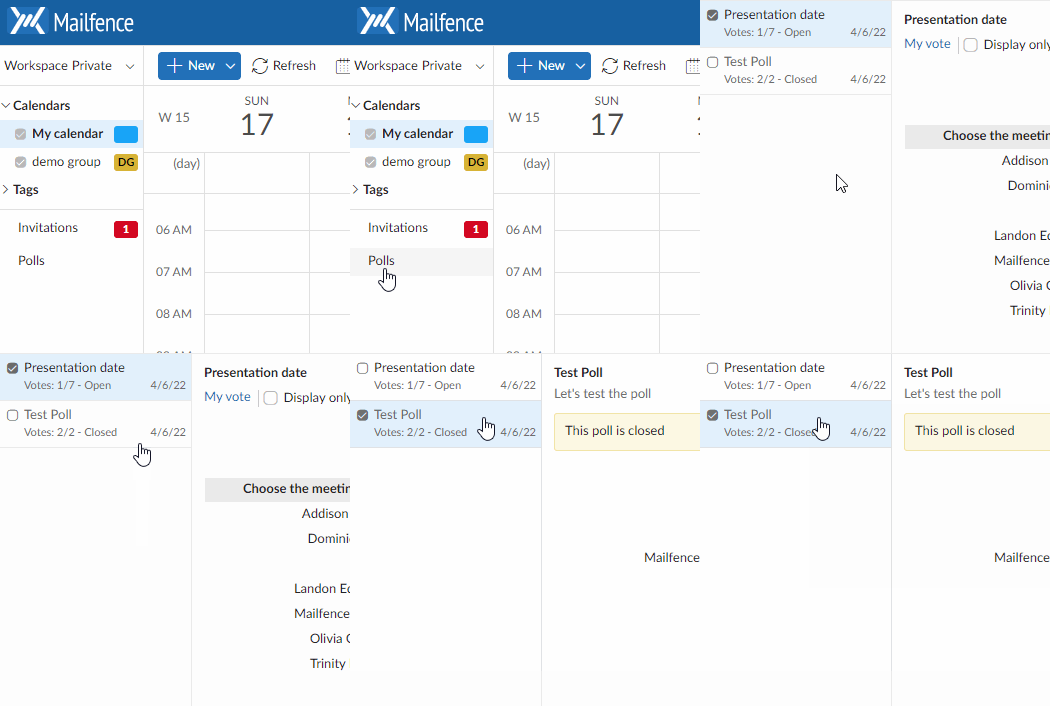
With Mailfence Polls you won’t have to resort to online poll services that track you endlessly and sell your data to other services. You can easily invite members from your Contacts list and you can schedule your meetings hassle-free. What’s cool about this is that participants don’t need a Mailfence account to participate.
Reminders & types of Reminders
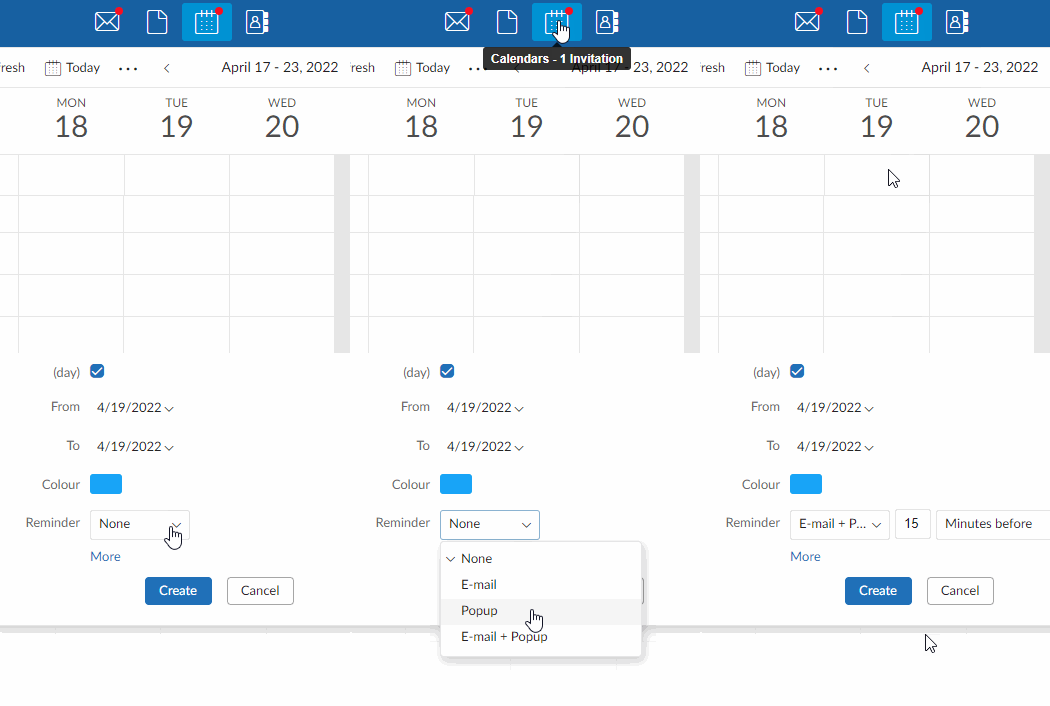
What kind of calendar would it be if it didn’t have reminders? There are 3 types of reminders you can either have email, pop-up within the instant messaging, or SMS reminders. Once you set up your event you can choose one of the 3 reminders. Note: pop-up and SMS reminders are available to paying users only.
Mobile synchronization
You can synchronize your mobile device, whether it uses Android or iOS so you can access Mailfence using Exchange ActiveSync protocol.
Synchronization with Outlook
You can also Synchronize Outlook with Mailfence. Your Mailfence account will be added to your Outlook client. Please note that data that is already present within Outlook, will not be visible to Mailfence you will have to manually import that data.
Synchronization with Thunderbird
If you prefer a more privacy-focused email client, we’ve got you covered. In fact, we prefer privacy-focused alternatives as opposed to software from Big tech companies.
You can synchronize your Calendar with Thunderbird by following the steps in our Knowledge-base.
Read-write Access with CalDAV
What is CalDAV? CalDAV is an access protocol that allows you to synchronize Mailfence with 3rd party calendar software.
Import & Export
You can easily import calendar events. Please make sure they are in iCAL/vCAL format.
Back-up your Calendar
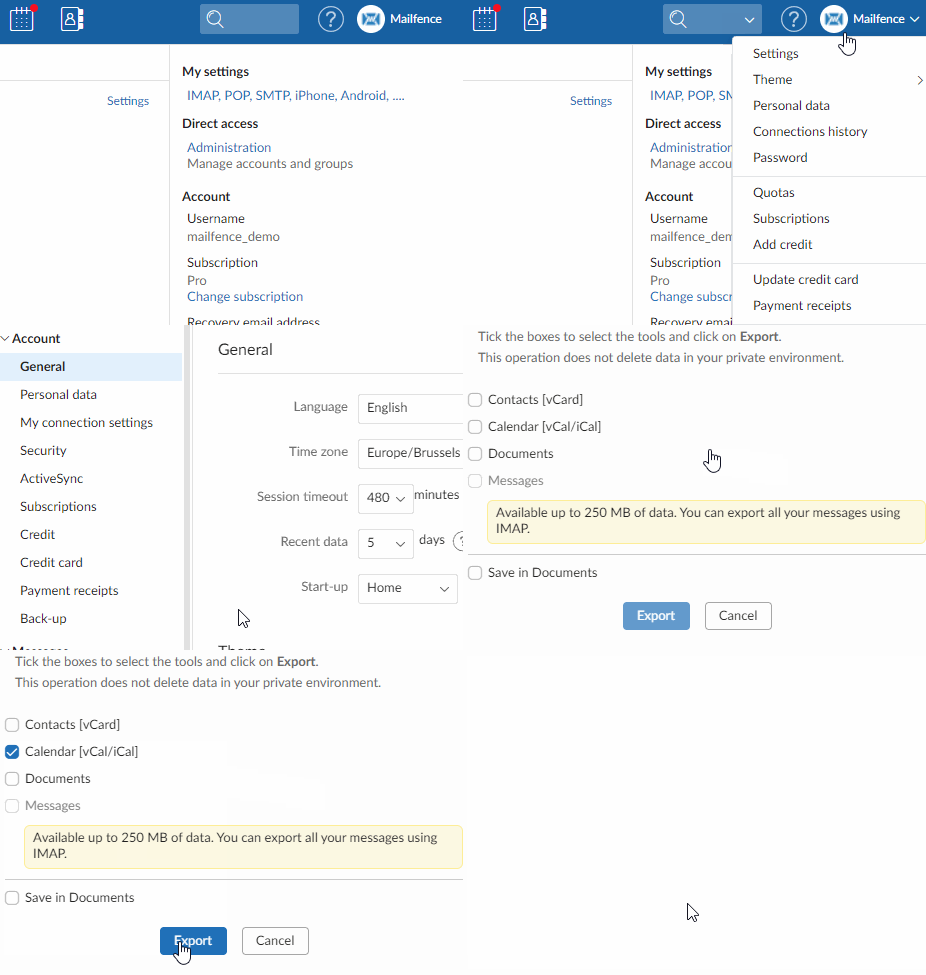
Being a paying user gives you many benefits such as the ability to back-up your calendars with 5 simple clicks. Go to settings -> General -> Back-up -> Choose the calendar option.
Ultimate Guide to Mailfence Contacts
This section will explain what the Mailfence Contacts component is and what you can do with it. Mailfence Contacts is a contact management tool that allows you to store & edit contacts and so much more. It is more than just a simple address book. With Mailfence Contacts you can create lists that allow you to send emails to a list of contacts without having to type one recipient at a time. You can also have a group address book where you can collaborate with your team/family or friends.
Getting started with the Mailfence Contacts
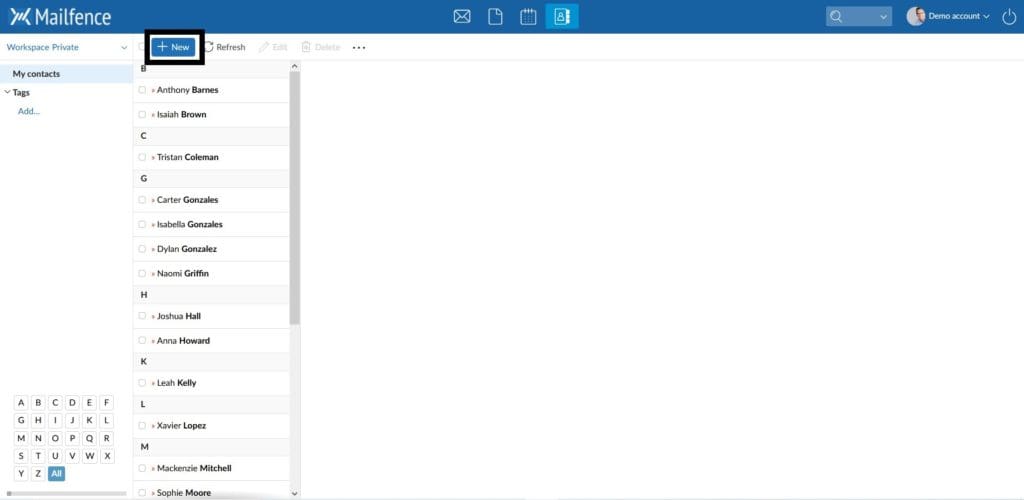
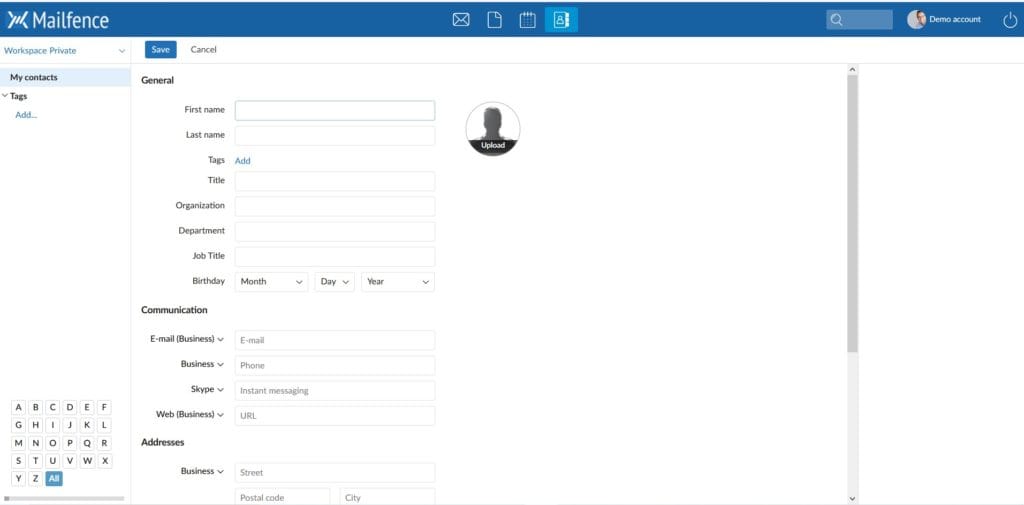
To get started simply go to the Contacts tool and Click on the “New” blue button to add a contact if you haven’t already. Additionally, once you are in the edit section of your contact you can add comments, attachments, birthdays, address details, and much more. You can also check the data of your contact. This function sends an email asking the contact to review his data. A hyperlink in this email allows this contact to view and edit the data. Only this person will be able to view and edit all the data (except the comment zone, invisible). Here is a list of things you can do with Mailfence Contacts:
- Add a contact or edit a contact
- Enter a birthday
- Add a comment
- Attach a document
- For more details visit our dedicated article on Mailfence Contacts
What are mailing lists and how to create them
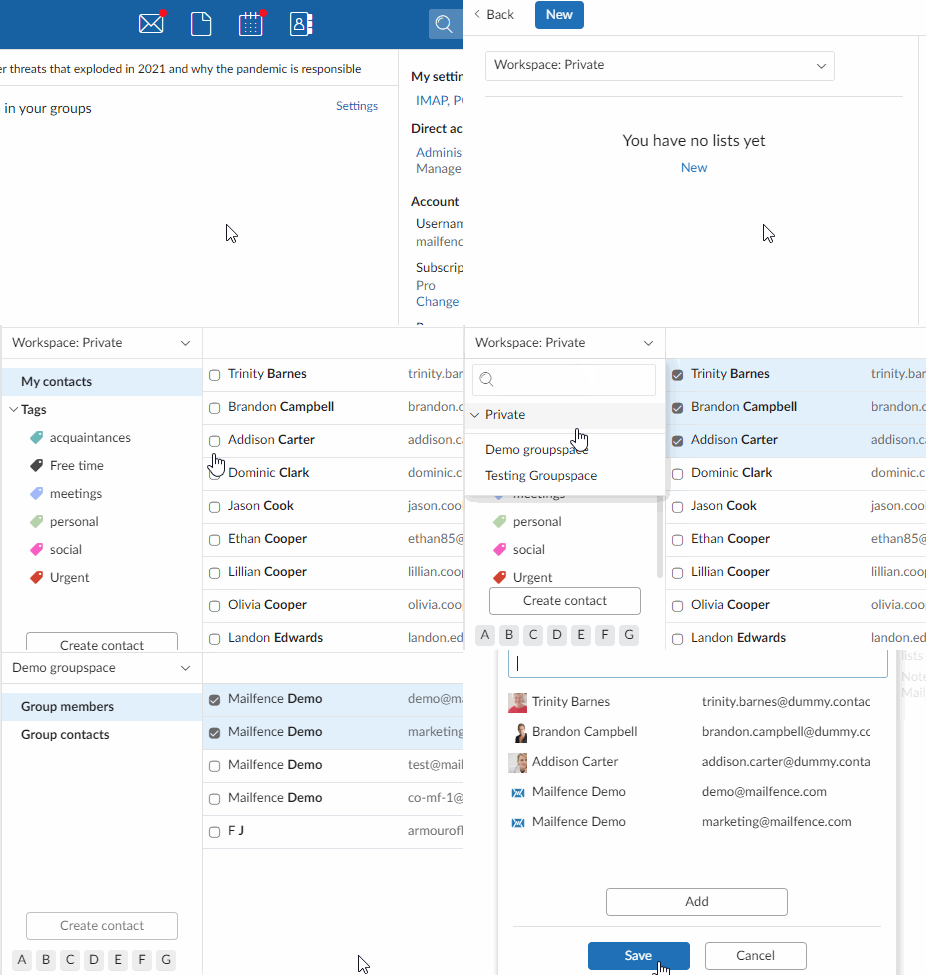
A mailing list or a contact list is a list with several contacts in it that allows you to easily group contacts and send emails to them. Instead of typing your recipients one by one in the BCC or CC, you can import your contacts once and then create a mailing list. You may also send a fax or an SMS.
Group Address Book & collaboration features
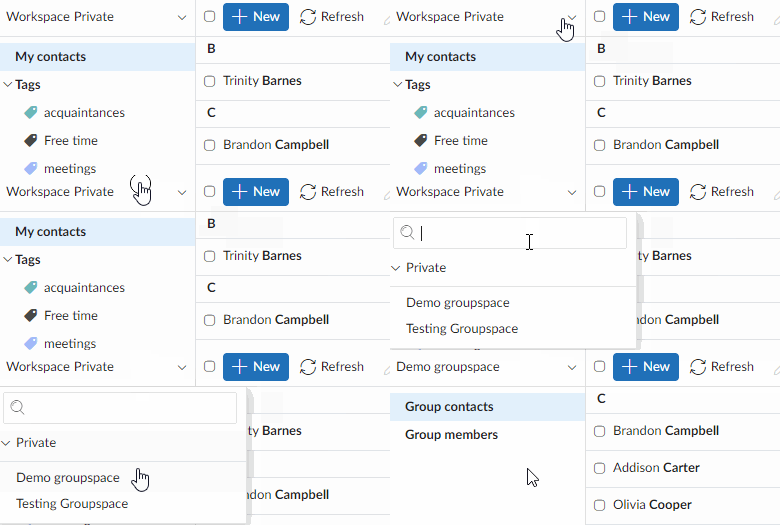
By utilizing our group function you can create a group address book that allows you to easily create, edit and share contacts with your group. That way you will save yourself a lot of time and effort. First, you need to create a group if you haven’t already by going to Settings -> Groups -> Create a group OR -> Join an Existing group.
From there, Go to the Contacts tool on the top-left click on workspace private and select your group.
Synchronization with Outlook
You can sync your contacts with the Outlook email client. The configuration is dead simple as Outlook 2013 and newer sync directly with Mailfence. For the exact steps please visit our Knowledge-base.
CardDAV synchronization
If you are using a CardDAV compliant third-party software and you would like to continue using it you can sync it with Mailfence. CardDAV is an address book protocol that allows you to access and share contact data through a server for more info on CardDAV have a look at the Wikipedia article about it.
Import/Export Contacts
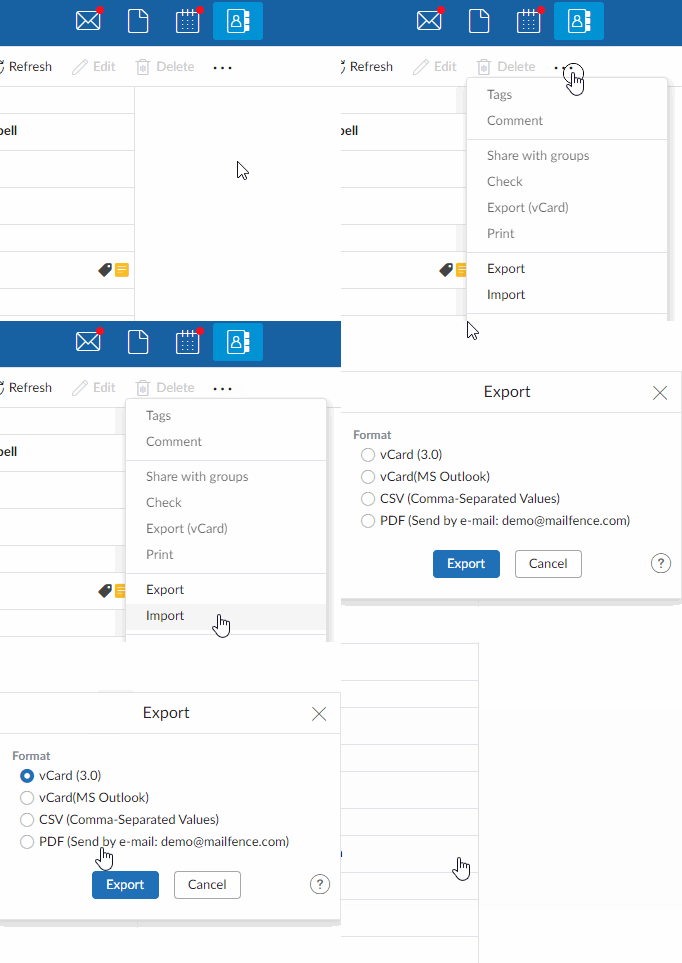
To import or export contacts first select your workspace private or groups. Then click on the action menu (3 dots at the top bar) and select import or export option. You can also export a contact by right-clicking on it.
Back-up your contacts
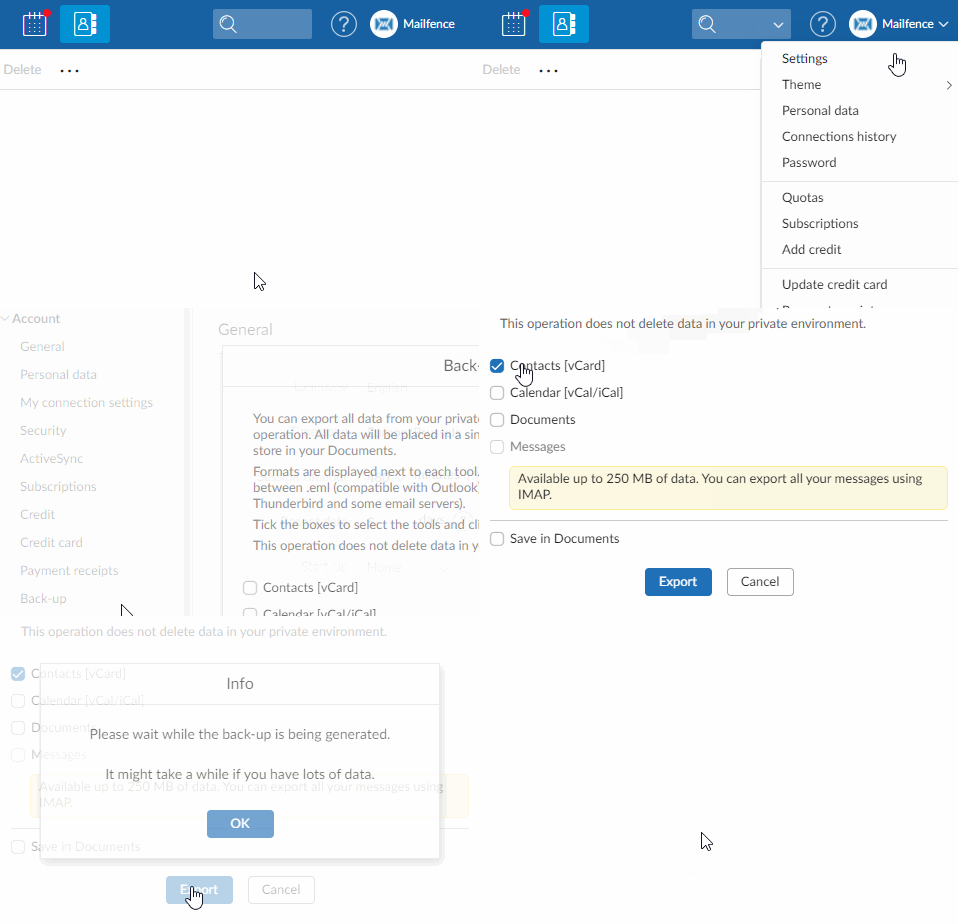
Being a paying user gives many benefits such as backing up your contacts in a few clicks. Go to settings -> General -> Back-up -> Choose the Contacts option.
Advanced features
Admin console
The admin console is a feature that allows you to create and manage users. One of the many possibilities of the admin console is that it allows you to manage users. This feature is especially useful for business owners that require multiple accounts. You can access the admin console if you are a paying user and by going to Settings -> Admin -> Users. For more details check our dedicated blogpost.
Instant Messaging
Another great advantage of having a group is the Instant messaging (IM) feature. It allows you to send instant messages to your group members. This gives you added flexibility as you don’t always have the time to send an email. However, the IM does not store logs meaning if you send something over the chat and then close the window it is lost forever so make sure you save the message if it is important before closing the IM window.
Note: all members must have a paying subscription.
Mailfence support resources
Knowledge-base (KB)
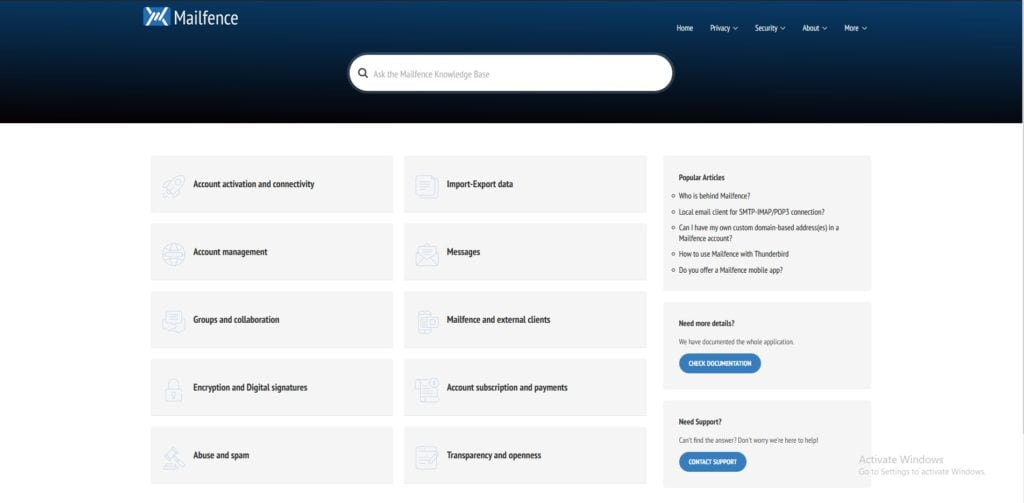
The knowledge-base of Mailfence or KB as we like to call it, is the dedicated support website of Mailfence. Here you will find commonly asked questions and how-to articles. These articles are meant to answer your specific query immediately. If you would like more info. on your query, there is always a link to the concerned blogpost. You can either use the search bar in the middle for your query or you can navigate yourself via the different categories. Currently, the KB is only available in English.
If something is not answered OR if you have ideas about something we should have covered please send us a mail at support[at]mailfence.com.
Online Help
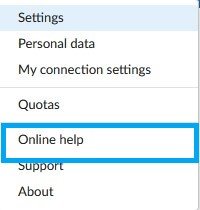
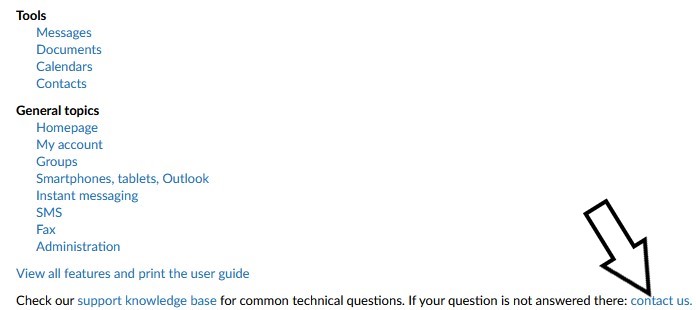
The online help can be accessed via the Mailfence interface. Click on your profile portrait on the top-right then select “Online Help” The online help contains a detailed explanation of each and every feature of the Mailfence tools. It is personalized to your account and contains the precise settings of your account.
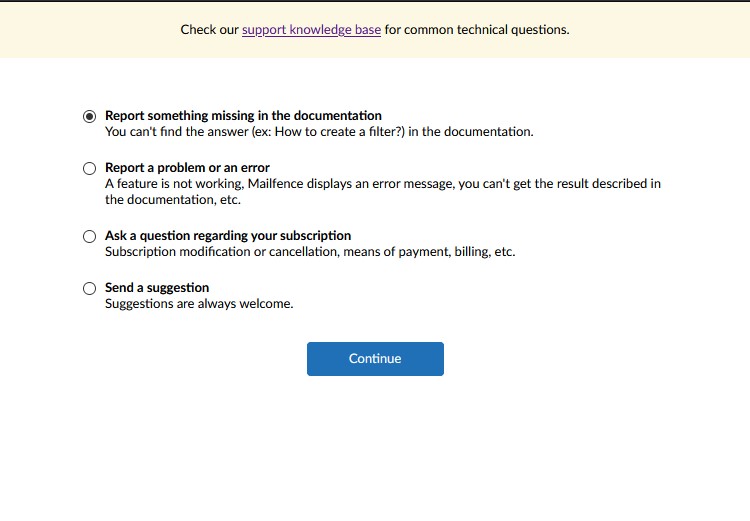
If you cannot find what you are looking for, please click the contact us button at the bottom of the page. It will allow you to submit a support ticket. Please give us a detailed description of your issue.
Online Documentation
Our third source of customer support is online documentation here you will find detailed explanations of each and every feature of the Mailfence tools. It is available in 6 languages. English, French, Dutch, German, Spanish, and Portuguese.
Customer support department
Our fourth and final source of customer support is the customer support department. Our team is comprised of multi-cultural and multi-lingual individuals who have made their mission to answer your every query. If you cannot find what you are looking for in other sources of customer support send us an email we would love to hear from you.
Final thoughts on the Ultimate Mailfence guide.
We put this guide for you, and we hope it delivered. By now you should be more familiar with Mailfence and its features, if not please let us know what you liked and what you didn’t like about our Ultimate Mailfence guide. If you like this explanatory type of content we will continue to make shortened and more interactive versions of them.
Follow us on twitter/reddit and keep yourself posted at all times.
– Mailfence Team